Wednesday, October 28, 2009

Pumpkin Cream Cheese Muffins


It's fall, which in the baking world, means time for pumpkin. I am not a huge Stabucks fan; I pretty much only order their black iced tea (no sweetener) or in the winter, their caramel apple cider. But I do love the pumpkin cream cheese muffins they bring out every fall. The big dollop of cream cheese in the middle is such a great contrast to the moist pumpkin. But at nearly $2 a pop, I can't afford to indulge in these treats very often, so I scoured the internet looking for a knock-off recipe. Ok, I didn't scour the internet; I pretty much just used the first recipe I found. But these muffins came out even better than the Starbucks original. They are dense, moist, spicy, and the cream cheese is perfect. I couldn't find any pumpkin seeds at my grocery store, so I omitted them, but if I had found them, I think I would have toasted them in butter and brown sugar.

These muffins taste even better a day or two after making them. The spicyness of the various spices really kicks in, giving these muffins a more pronounced tasted. That came out weird...they just taste better after a few days. I took a platter of these muffins to work and they were completely gone within an hour. I think that's a pretty good indicator of how great they really are!

The original recipe called for 1 1/4 cups of vegatable oil. I replaced the entire amount of oil with applesauce to cut down on some fat and calories. I also used neufchatel cheese instead of cream cheese; the grocery store worker told me they were interchangeable, with neufchatel cheese containing less fat than regular cream cheese. I didn't notice any difference in flavor. Also, the original recipe called for 2 cups white sugar, but I decided to use half white and half brown, just to change things up a bit.


Pumpkin Cream Cheese Muffins
Adapted from Musings of a Mommy
Printable Recipe

Ingredients
For the muffins:
3 cups flour
1 heaping teaspoon cinnamon
1 heaping teaspoon nutmeg
1 heaping teaspoon ground cloves
4 1/2 heaping teaspoons pumpkin pie spice
1 teaspoon salt
1 teaspoon baking soda
4 eggs
1 cup white sugar
1 cup brown sugar
2 cups canned pumpkin puree
1 1/4 cups unsweetened applesauce

For the cream cheese filling:
8 ounce package cream cheese (or neufchatel cheese), softened
1/2 cup powdered sugar
1/2 teaspoon vanilla
1 tablespoon brown sugar


Directions:
Pre-heat your oven to 35o degrees.

In a large mixing bowl, combine the first 7 ingredients for the muffins. Mix together until just combined.

In a seperate bowl, beat the eggs and mix in the sugars.

Add the egg and sugar mixture to the dry ingredients. Add in the pumpkin puree and applesauce, and mix until well combined.

Spoon into greased muffin tins. Set aside.

In a medium bowl, combine the cream cheese, vanilla, powdered sugar, and brown sugar. Mix until well combined.

Spoon into a sandwich bag sized ziploc. Cut off the tip of one corner. Pipe the cream cheese into the muffin batter, pushing it down into the batter slightly.

Bake for 20-25 minutes, or until a toothpick inserted into the muffin (avoid the cream cheese) comes out clean. Let cook 5-10 minutes before serving.


Sunday, October 25, 2009

I miss you!

I know it's been a long time since I've posted; I went on vacation for 3 days and now I am currently house sitting, so I haven't had much chance to blog lately. But stay tuned--I've got some new recipes ready to blog, including pumpkin cream cheese muffins.

Tuesday, October 13, 2009

Chicken Noodle Soup


It seems like summer ended and the cold weather came in over night! What happened to Indian Summer this year? I am missing the warm, but not hot, southern California fall days we usually have in October? It is even going to rain this week! Ugh.
But the good part about this cold weather is that we can enjoy a big bowl of hearty soup. And that is exactly what this chicken noodle soup is: hearty, filling and delicious.

Chicken Noodle Soup Source: Adapted from How to Boil Water Printable Recipe

Note: this makes a huge pot, serving 10-12 people

Ingredients
3 carrots
3 ribs celery
1/2 an onion
3 cloves garlic
4 tablespoons butter or olive oil
1/2 teaspoon salt
1 handful fresh sage (about 6 large leaves), chopped
1 tablespoon fresh oregano
3-4 springs fresh thyme
12 cups low sodium chicken broth
1 package egg noodles
1 rotisserie chicken, skin removed
3/4 lemon, juiced
zest of 1 lemon
lots and lots of pepper

Directions

Peel the carrot. Slice the carrot, celery, and onion. Smash and peel the garlic. Chop into large chunks.

Heat the butter in a large pot over medium heat. Add the vegetables and cook until softened, about 8-10 minutes. Season with salt and pepper. Add the sage, oregano, and thyme (discard stems).

Add the broth and lemon juice and bring to a boil over high heat. Add the pasta and lemon zest and cook uncovered, just until the pasta is tender, about 7 minutes. Season with pepper. Meanwhile, shred the chicken into large chunks.

Add the shredded chicken and cook until the chicken is heated through. Season with pepper.

Serve with a hunk of French bread to soak up the broth.

Monday, October 12, 2009

Buffalo Potato Wedges


These are a great football snack. They do take about an hour, start to finish, but if you start chopping potatos during the pre-game shows, you'll have your snack by the end of the first quarter. They are spicy, so make sure you have a bowl of bleu cheese dressing and a beer handy!

Note: the following recipe easily serves 4-5 people. You can halve it if there are just two of you.

Buffalo Potato Wedges
Source: Adapted from Love Delicious
Printable Recipe

Ingredients
5 baking potatos
1/2 cup buffalo wing sauce
1/2 cup butter
salt
pepper
garlic powder
olive oil

Directions
Pre-heat the oven to 375 degrees.

Wash the potatos to remove any dirt. Slice into wedges (I prefferred thinly sliced, but thick works too), but don't peel the skin.

Place the wedges on a greased cookie sheet, in one layer. Spray or brush with olive oil (just a thin coating is fine). Sprinkle generously with salt, oepper and garlic powder.

Cook the potato wedges for 30 minutes. Meanwhile, melt the butter in a bowl and then mix in the buffalo sauce.

After 30 minutes, remove the potatos from the oven. Now is a good chance to try one and see if it has enough salt, pepper, and garlic powder for your tastes. If not, season again. Then, drizzle the wing sauce and butter mixture over the wedges. If you like them really spicy, put a thick coating over each potato. Otherwise, a heavy drizzle will do.

Return them to the oven and bake for an additional 15 minutes. If your wedges are really thick (pver 1/2"), you may want to cook them for an additional 5 minutes.

Serve with bleu cheese dressing to dip, and an icy beer.

Touchdown!

Sunday, October 11, 2009

Korean Beef with Brown Rice


I don't have a real recipe for you today, as the main component of this dish is pre-marinated meat I pick up at the Korean market. But if you have a Korean grocery store near you and they carry pre-marinated Korean beef, this is a really quick, easy, and flavorful dish. I'm sure there are tons of recipes for Korean beef online (or from my friend at work, who i have been trying to get the recipe from since last October!), so you can always make the entire thing from scratch if you'd like.

Before you get started on cooking the meat, be sure to get your rice going so it is ready when the beef is.

Korean Beef with Brown Rice
Source: me
Printable Recipe

Ingredients
1 pound marinated Korean beef
1 small onion (I used white, but you can use any type of onion here), chopped
4 garlic cloves, diced
1 tablespoon sesame oil
1 cup uncooked brown rice
2 cups water

Directions:
Combine the rice and water in a rice cooker, turn it on and let it cook for you.

Heat a large wok over high heat. Add the seasme oil and swirl around the pan, up the sides, to coat the surface.

Once the oil is hot, add in the onions and garlic, cooking until softened and garlic is fragrant.

Add in the beef, reserving the juices/marinade, and stir fry for about 5 minutes. Add in the juices/marinade and continue stir frying until the meat is cooked through (about 10 to 15 minutes).


Serve the meat over the rice.

Sunday, October 4, 2009

Crockpot Tri Tip


I have not had much success in cooking with my crockpot since I bought it about 2-3 years ago. Everything came out gross, mushy, too liquidy, and just not up to par. I was about ready to get rid of it when my mom advised me to try cooking a tougher cut of beef in the crockpot (I had previously only made boneless, skinless chicken breasts). My husband and I were still skeptical, but Von's had untrimmed tri tip on sale for $2.47 a pound today (they normally charge at least $8 a pound), AND I had a coupon for an additional $2 off of one tri tip. So I headed off to the store and bought two 3-pounders and hoped for the best.

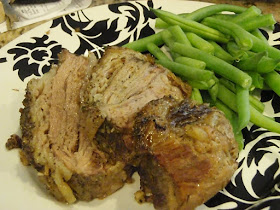
I didn't use a recipe for this one. I just coated the meat in pepper, added a bit of salt, and some crushed garlic and turned on the crock pot until the meat was cooked and tender. This turned out fantastically! My husband, who has a tiny appetite, ate two servings and finished the few bites left on my plate. We served it with steamed green beans and I spooned the liquid left in the crock pot on top of the meat. We're planning on eating the leftovers, smothered in BBQ sauce, for dinner tomorrow.

This meal has converted me into a crockpot fan; it couldn't be easier. Season the meat, throw it in the pot, and turn on. Several hours later, dinner is ready.

Crockpot Tri Tip

Source: ME!
Printable Recipe

Ingredients
  • 3 pound untrimmed tri tip
  • pepper
  • salt
  • 3 cloves garlic
Directions

Place the tri tip in the crockpot insert, with the fatty cap facing up. Coat the top in pepper (I used a combination of black pepper and freshly ground citrus pepper).


Chop up the garlic and then sprinkle with salt. Smash the garlic and salt together with the back of a spoon, making a chunky paste. Sprinkle the paste on top of the tri tip.

Let stand for 30-60 minutes.

Cook in on low for 8 hours, or on high for 4 hours.

Slice and serve. Or slice, smother in BBQ sauce, and make sandwiches.

Saturday, October 3, 2009

Pumpkin Pie Ice Cream


My husband is the best at gift giving. Ever since we met he has always put a ton of thought and care into purchasing me gifts. A few months into dating he surprised me with a pair of pink Converse just because he knew I liked them. Christmas and birthdays are no different; I always get the best gifts. Not that presents are what makes a relationship, but it is nice to be married to someone who knows exactly what I want.

This year my birthday was no exception. I talked about buying the ice cream attachment for my Kitchen Aid mixer all summer, but was hesitant to spend that much money. So of course, I received the coveted attachment for a birthday gift last week!

I wanted to try a simple, yet seemingly fancy flavor for my first attempt. Luckily my KA attachment came with several recipes, including this one for pumpkin pie ice cream. A perfect match of fall flavors and the 90+ degree southern California weather!

Pumpkin Pie Ice Cream

Source: Adapted from Kitchen Aid
Printable Recipe

Ingredients
  • 1 1/2 cups light cream (My store didn't have this, so I just used whole milk. You can also sub 1/2 and 1/2)
  • 6 egg yolks
  • 3/4 cup sugar
  • 1/2 teaspoon vanilla extract
  • 3/4 teaspoon pumpkin pie spice (I used 1/2 teaspoon cinnamon and 1/2 teaspoon nutmeg)
  • 1 1/2 cups heavy cream (Again, my store didn't have this, so I used heavy whipping cream)
  • 1 1/2 cups canned pumpkin puree
  • 2 teaspoons brown sugar (my addition)

Directions
(Make sure to freeze your freezer bowl at least 15 hours in advance)

Scald the light cream in a heavy saucepan. In a medium bowl, whisk together the egg yolks, white sugar, and vanilla.

Gradually whisk the cream into the yolk mixture. Add in the spice.

Return the entire mixture to the saucepan and stir over medium-low heat until the mixture thickens; about 10 minutes. Do not allow to boil. Remove from heat.

Whisk in the heavy cream, pumpkin, and brown sugar.

Cover and refrigerate until well chilled (over night is best).

Assemble the freezer bowl attachment and turn the mixer on to ONE. Pour the chilled ice cream batter into the bowl and continue to stir on ONE for 15-20 minutes, or until it is the desired consistency.

Serve immediately, sprinkled with nutmeg, or freeze.

Makes about 8 one cup servings.