Showing posts with label fruit. Show all posts

Wednesday, December 1, 2010

Blackberry Cranberry Sauce


This was the second year that the husband and I hosted Thanksgiving dinner in our home--we like the tradition of inviting our families over and cooking a big meal for everyone. Last year, I made the majority of the meal, but asked each of our families to bring a dish as well. This year I decided to make the entire meal myself, which gave me the chance to try out some new recipes.

In my family, we traditionally have spiced cranberries for Thanksgiving dinner, and the husband's family likes the whole jellied canned cranberries, but when I saw these blackberry cranberries posted on Annie's Eats, I knew I wanted to give them a try.

While I was making them, I have to admit, I was skeptical. They tasted odd and too sweet to me at first. But after chilling in the fridge overnight they were fabulous! The cranberries still had a bit of a bold, spiced flavor, but the blackberries added a nice texture and sweetness. I'd definitely make these again in the future.

Note: I doubled the recipe because I like lots of leftovers on Thanksgiving. The recipe below is the original, non-doubled, amounts.

Blackberry Cranberry Sauce
Source: Annie's Eats
Printable Recipe

Ingredients
12 ounces fresh cranberries
2 cups blackberries
1 cup sugar
¼ teaspoon salt
¼ teaspoon allspice
2 teaspoons cornstarch
2 Tablespoons water

Directions
Place cranberries in a medium saucepan. Add water to the pan, just under 1-inch deep (berries do not need to be completely covered.)

Heat over medium-high heat until the berries begin to pop. Cook a few minutes more, until most of the skins have popped.

Gently stir in the blackberries, sugar, salt and allspice.

In a small bowl, combine the cornstarch and water and whisk together until smooth. Add the mixture to the pan with the berries and stir to incorporate.

Bring the cranberry mixture to a boil, then reduce the heat to medium and cook until the sauce has thickened. (I cooked mine for about another 10 minutes or so.) Smash the berries a bit while you stir, leaving some berries intact for a chunkier texture.

Remove from the heat and allow the mixture to cool. The sauce will continue to thicken as it cools. Refrigerate until ready to serve.

Monday, October 18, 2010

Homemade Pumpkin Puree


A few weeks ago I was earnestly awaiting fall. Never mind the 100+ degree temperatures we were still experiencing; I wanted to taste fall! The best way to satisfy a fall craving is with pumpkin treats, so I set out to the grocery store to pick up a can or too of pumpkin puree. Of course, the shelves were bare. Two years in a row of poor pumpkin crops led to two years of a pumpkin shortage. Even suppliers online were estimating shipping times upwards of 2 months!

Just as I was thinking about roasting pumpkins for my own pumpkin puree, Annie of Annie's Eats posted a tutorial on that very topic, taking all the guesswork out of it for me! By the time I got around to picking up some pie pumpkins, canned pumpkin puree was back on the shelves. However, I fancy myself a hippie of sorts, so I still wanted to give homemade pumpkin puree a try. Super easy, though a bit messy. If anyone out there has a baby, I bet this would make for some great homemade baby food too.

You can freeze your homemade pumpkin and save for the next time you're craving a homemade pumpkin treat. I used mine to make pumpkin cream cheese muffins....yum!


Homemade Pumpkin Puree
Source: Annie's Eats

Printable Recipe


Ingredients
Pie pumpkins
water

Directions
Pre-heat your oven to 350 degrees.

Using a sharp knife on a stable surface, slice each pumpkin in half lengthwise. I found their shells to be very hard, so be careful!

Scoop out all the pumpkin "guts" and seeds. Set aside if you want to make roasted pumpkin seeds, otherwise discard.

Place the pumpkin halves face down on a cookie sheet (be sure to use one with raised sides). Pour water onto the cookie sheet until it's about an inch or so deep. This will help steam the pumpkin flesh.

Bake the pumpkins for about 60-90 minutes, or until a fork can easily pierce through the shell. Let cool.

Drain the water off of the cookie sheet and discard. Scoop the roasted flesh out of the shells and into a food processor. Process until it is a smooth puree.

Line a mesh strainer with paper towels and set over a medium bowl. Scoop the pumpkin puree into the strainer and let sit for about an hour. This allows the excess liquid to drain out of the puree. Discard the liquid and store your pumpkin puree in a freezer-safe container. Freeze if you are not going to use in the next few days.
Note: I got about about 3 cups of pumpkin puree from two pie pumpkins.

Sunday, September 19, 2010

An Apple A Day


The calendar says fall, but here in sunny southern California, the temperatures still shout summer. Just yesterday, we hit record-breaking temperatures, including a scorching 111 degrees where I'm at! Not fun when you park on the wrong end of campus and have to walk about 2 miles from the parking lot to your class, followed by taking the stairs up to the 6th floor. yuck. It was still 97 degrees when my class ended at 7pm!

After an incredibly hot August, and now September, I'm ready for it to start feeling like fall, and I felt like an apple spice cake with a maple cream cheese frosting would be just the thing. When I was googling I came across Bakerella's Apple Cake Pops (which she made with chocolate cake) and *knew* I needed to combine the cake pops idea with the apple spice cake recipe for a fun fall treat!

With a 3 hour professional development training scheduled after an already long school day, my principal thought snacks might help the pain of staying at work until 6pm on a Monday night, so she asked me to bake up some cookies. But instead, I brought these apple cake pops!

Apple Cake Pops
Source: Cake and frosting from Eggs on Sunday
Cake Pop idea from Bakerella

Cake Ingredients
1 1/2 cups whole wheat pastry flour
1 teaspoon baking powder
1 teaspoon ground cinnamon
1/4 teaspoon ground cloves
1/4 teaspoon ground ginger
1/4 teaspoon ground nutmeg
1/4 teaspoon baking soda
1/4 teaspoon salt
1/2 cup unsalted butter, softened
3/4 cup firmly packed light brown sugar
1 teaspoon vanilla
2 large eggs
2/3 cup plain Greek yogurt
2 tart apples, peeled and diced small

Cake Directions

Preheat your oven to 350 degrees.

Butter and flour a 9 x 13" baking pan (Eggs on Sunday reccomends an 8" or 9" pan, but since I was making the cake into pops, I wasn't so concerned with a thick fluffy cake.).

In a medium bowl, whisk together the dry ingredients (flour through salt). Set aside.

In the bowl of an electric mixer with the paddle attachment, beat the butter on medium speed until creamy, about 1 minute.

Gradually add the brown sugar and continue beating on medium-high speed until well blended and light, about 2 minutes.

Add the vanilla, then the eggs, one at a time. Beat well after adding each egg, and scrape down the sides of the bowl as needed.

Reduce the speed to low and add the flour mixture in three additions, alternating with the yogurt, in two additions. Mix just until blended. Turn off the mixer, add the diced apple and stir by hand.

Scrape the batter into the prepared pan and smooth the top. Bake for about 30 minutes, until the top is light golden brown and a tester inserted into the middle comes out clean.

Let cool for about 5-10 minutes, then crumble the cake into a large bowl. Finish cooling the cake in the refrigerator while you make the frosting.

Frosting Ingredients

6 ounces cream cheese, softened
3 Tablespoons unsalted butter, softened
1/2 teaspoon vanilla
1/8 teaspoon ground cinnamon
1/8 teaspoon ground ginger
pinch ground nutmeg
pinch salt
1 Tablespoon pure maple syrup (NOT fake syrup! Spring for the real deal here)
1 cup confectioner's sugar

Frosting Directions
Using an electric mixer, beat together the cream cheese and butter on medium speed, until smooth.

Add the vanilla, maple syrup, spices and salt. Reduce the speed to low and add the confectioner’s sugar. Beat until well blended. Increase the speed to high, and beat until light and creamy, about 2 minutes.

Mix into the cooled, crumbled cake.

Cake Pop Materials

Lollipop sticks (I needed 2 bags. Buy them in the cake decorating section at Michaels)
Pretzel rods, ends broken off into about 1/4" pieces
Green sprinkles (I used small star-shaped sprinkles. Be creative!)

Making the Cake Pops

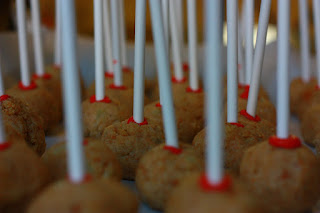
After mixing the frosting into the cake, being sure it is evenly combined, shape about 1-2 Tablespoons into balls, using your hands. I got about 40 or so cake balls out of this cake recipe.

Set the balls on a piece of wax or parchment paper and chill until firm, about 10-15 minutes in the refrigerator. Once the cake has firmed up, melt the candy melts in the microwave and stir until smooth. Dip the end of a lollipop stick into the melted candy and then gently push into the center of each cake ball.

That's a lot of cake pops!

Return to the refrigerator for another 5 to 10 minutes to allow the melted candy to firm up on the sticks.

Rewarm the melted candy in the microwave for about 15 seconds, stirring until smooth. Make sure the candy is completely melted and free of lumps. Gently dip the cake pops into the candy melt, completely covering each cake ball.

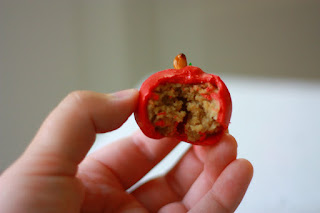
Gently lift the cake ball out of the melted candy and lightly tap off the excess. Stick the end of the lollipop stick into a thick block of styrafoam. Immediately, press the end of a pretzel stick into the top of each "apple" and add a green sprinkle. I found it was easiest to place the sprinkles with a pair of (clean!!) tweezers.


Let sit until the candy coating is completely dried and has firmed up.
Monday, August 16, 2010

Pomegranate Semifreddo and Blueberry Sorbet Bars


First off, I apologize for the long delay in posting!! My laptop was at the Apple store, undergoing repairs for the past several days, and since all my pictures are stored on my laptop, I couldn't post. Also, I recently decided to delete a TON of pictures out of my iPhoto application, hoping it would help speed up my slooooooow computer. In my purging, I deleted photos of several dishes I had not yet blogged....and iPhoto was the only place I'd stored those particular photos. *sigh* That is just like when I decide to clean my house and then throw away, or otherwise misplace, papers that I actually need.

Ok, without further ado, the creamy deliciousness that is pomegranate semifreddo and blueberry sorbet. Another blogger made a similar creation, using completely different flavors recently, adapted from a recipe in Gourmet. I instantly looked up the original Gourmet recipe and decided with my flavor changes, this would be a great dessert for my dad's birthday dinner. He loves blueberry desserts, but I didn't want to make something ordinary, like a pie, so I set out to make this cool concoction.


Semifreddo is Italian for half-cold and refers to any chilled or frozen desserts, including cakes, pies, ice cream, and custards (thank you Google and Epicurious!). The semifreddo in this dessert is a frozen creamy delight, not really ice cream, but not a custard either. I just called it yum.

When freezing your dessert, make sure your pan or container lies flat in the freezer or the contents will slide, making for an uneven, though still deliciously edible, dessert. I used frozen blueberries for the sorbet, as that's what I had on hand, but I bet this would be even better with fresh! Also, the sorbet in this dessert is modified from the blueberry sorbet I made previously; either one would work well here.

I'd recommend making this a day in advance in order to give it enough time to fully freeze; I made mine just a few hours before my parents came over for dinner and it wasn't fully set once it was time for dessert. We ate it anyway, but I would've liked it to have been perfectly ready.

What flavor combination would you use for this dessert?


Pomegranate Semifreddo and Blueberry Sorbet Bars
Source: Semifreddo adapted from
Gourmet, Blueberry Sorbet adapted from The Perfect Scoop
Printable Recipe


Blueberry Sorbet Ingredients
4 cups blueberries
1 cup water
1/3 cup sugar + 1-2 Tablespoons sugar
1/2 Tablespoon Limencello

Semifreddo Ingredients
1
(14-oz) can sweetened condensed milk
1 Tablespoon lime juice
1/2 cup pomegranate juice
1/2
cup chilled heavy cream
blueberries and/or pomegranate seeds for garnish, optional
Sorbet Directions
Line a 9 X 9 pan with plastic wrap.

Combine all ingredients in a blender and blend until smooth.

Strain the mixture to remove the skins and seeds (you definitely want to do this unless you want all your guests to wind up with blueberry stuck in their teeth!).

Freeze in your ice cream maker, following manufacturer's directions.

Smooth into the 9 x 9 pan and place in the freezer, ensuring it is on a level surface.

Semifreddo Directions
Whisk together condensed milk, lime juice, and pomegranate juice.

Beat the chilled cream until it just holds stiff peaks, then gently fold into the condensed-milk mixture.

Spread over the blueberry sorbet, smoothing the top. Freeze until solid, at least 2 hours, ensuring the pan is on a level surface in your freezer.

Cut into bars and garnish with fresh blueberries and/or pomegranate seeds, if desired. Keep remaining portions in the freezer.

Friday, August 6, 2010

Blueberry Sorbet


I was craving a sweet treat recently, but didn't want to indulge in the full fat ice cream I usually make. I opened the freezer to see what I had on hand and saw several bags of frozen fruit: strawberries, cherries, blueberries, and mixed berries. I know, I know, we're in the thick of summer and all of those are summer fruits. But I didn't want to go to the store to pick up fresh fruit, so I stuck with the frozen, which is picked at the height of ripeness anyway, so it makes a fine substitute.

Anyway, I digress. Looking at the big bag of frozen blueberries I decided to go with a blueberry sorbet, and of course, turned to my ice cream bible, The Perfect Scoop. Alas, the tome doesn't include a blueberry sorbet recipe, but it does have a simple blackberry sorbet that I decided to modify, using the ingredients I had on hand. The original recipe calls for fresh lemon juice to help contrast the sweet flavor of the fruit, but I was out of lemons. So I used vodka. Ok, ok, I know what you're saying. Vodka is not acidic like lemon juice, but I was going to use it anyway, since the alcohol content helps keep the sorbet from freezing rock hard.

The only thing I wish I had done differently was cut the sugar down a bit; blueberries are naturlly sweeter than blackberries, so I didn't need to use the same amount of sugar as called for in the original recipe. Oh well, live and learn, right? The final result wasn't TOO sweet, but I think it would be better with a bit more tartness. Which the lemon would have provided. :)


Blueberry Sorbet
Source: Adapted from The Perfect Scoop
Printable Recipe

Ingredients
4 cups blueberries
1 cup water
2/3 cup sugar
1 Tablespoon vodka

Directions
Combine all ingredients in a blender and blend until smooth.

You can strain the mixture if you want a completely smooth sorbet, but I left mine unstrained.

Freeze in your ice cream maker, following manufacturer's directions.

Transfer to a storage container and store in your freezer.

Tuesday, July 13, 2010

Oatmeal Applesauce Muffins


The husband and I recently headed up the coast a bit to visit some friends for the weekend and celebrate their daughter's 1st birthday. This was our first trip up to see them, after they've made many visits down here, and we were spending the weekend in their (gorgeous!) home, so I wanted to bring a 'thank you' treat. I figured with two small children, fruit muffins would be appreciated-they're great for a healthy afternoon snack or quick breakfast.

I hesitated on whether or not I should bring them after asking the husband his opinion once I took them out of the oven. I wasn't offering a taste, so he just took a look and made a face, saying they didn't look that great. I waffled back and forth over taking them or not, but as there wasn't enough time to make anything else, I decided to just go ahead and pack em up, ugly or not.

Thankfully, our friends care less about looks and more about taste, and were more than happy to receive these muffins. G, who is obsessed with fiber, was even more excited when I told him they were made with whole wheat flour, oats, and tons of fruit...in other words, packed with fiber. The kiddos made quick work of a couple muffins right away, gobbling them down as a late afternoon snack. Their one-year-old daughter seemed to especially like them, eating two in quick succession!

Oatmeal Applesauce Muffins
Source: Adapted from Joy the Baker
Printable Recipe

Ingredients
1 1/4 cups whole wheat flour
1 1/4 cups oats
1 teaspoon baking powder
1/2 teaspoon baking soda
1/4 teaspoon salt
1 teaspoon cinnamon
1/4 teaspoon nutmeg
1 cup unsweetened applesauce
1/2 cup low-fat buttermilk
1/2 cup firmly packed brown sugar
2 Tablespoon canola oil
1 large egg lightly beaten
1 cup berries, fresh or frozen (I used a combination of frozen mixed berries and sliced fresh strawberries)
Strawberry halves for garnish, optional

Directions
Preheat the oven to 375 degrees. Spray a muffin pan with nonstick spray, or line with paper liners.

In a large bowl, combine the flour, oats, baking powder, baking soda, salt, cinnamon and nutmeg. Stir just until combined.

In a separate medium bowl, combine the applesauce, buttermilk, brown sugar, oil and egg. Stir until combined.

Pour the wet ingredients into the flour mixture and stir just until combined. Gently fold in the fruit with a spatula.

Wednesday, June 16, 2010

Cherry Pie


The husband and I went to my parents' house, along with my brother and his wife, for a Memorial Day BBQ and my mom asked me to bring a dessert. I figured what better way to kick off the summer than with a cherry pie?

Though the picture is pathetic, this was a really tasty pie. Make sure you use tart cherries; the sugar will make sweet cherries too sweet for this recipe.


Cherry Pie

Source: Shared by an online cooking acquaintance (from Musselman's canned cherries)

Printable Recipe

Ingredients

2 cans (14.5 ounces each) red tart pitted cherries
1 cup reserved cherry juice
1 cup sugar
3 Tablespoons cornstarch
1 Tablespoon butter
1/4 teaspoon almond extract

Directions
Pre-heat oven to 425 degrees. Grease a 9" pie dish and gently press in a pie crust.

Drain the cherries, making sure to reserve 1 cup of the liquid.

Mix the sugar and cornstarch together in a heavy saucepan. Gradually stir in the reserved cherry liquid until the mixture is smooth. Cook over medium heat until the mixture bubbles.

Cook an additional minute until the mixture is thick.

Remove from heat and stir in butter, cherries, and almond extract.

Pour into prepared crust. Top with a lattice or vented crust (I cut out pie crust starts to top my filling).

Bake at 425 degrees for 10 minutes. Reduce oven temperature to 350 and bake 25-35 minutes, until the crust is golden brown. (Note: I placed my pie on a baking sheet to capture any boil over of the pie filling.)

Wednesday, May 26, 2010

Summery Fruit Salad


I'm back with a healthy recipe, here people. Consistently inconsistent, right?

I made this refreshing fruit salad to keep as a quick snack and easy healthy lunch item for week day lunches. I actually meant to include jicama in it as well, but forgot to pick some up at the store. The husband requested grapes be included, but they were super expensive for some reason, and they didn't actually look that great, so I opted to leave them out this time. But that's the great thing about fruit salad, you can really just throw in whatever you want: pineapple, grapes, oranges, papaya, whatever.

I decided to use a squeeze of lime juice instead of dressing to keep the salad simple and healthy, as well as let the flavors of the fruit shine through. The lime juice gives all the fruit a nice tang and the basil adds an interesting savory-sweet depth of flavor.

Summery Fruit Salad
Source: A Cooking in Cucamonga Original
Printable Recipe


Ingredients
1/2 a small seedless watermelon
1 pound strawberries
2 pints blueberries
2 kiwi
1 champagne mango
4-5 small basil leaves
juice of 1 lime

Directions
Rinse all fruit well. Remove the strawberry stems, peel the kiwi and mango, julienne the basil, and cut the watermelon into chunks.

Toss all of the fruit together in a large bowl with the lime juice. Refrigerate until it is time to serve.

Thursday, April 15, 2010

Strawberry, Banana, Blueberry Muffins


My cousin and his wife recently had a baby, who I couldn't wait to meet. In a nice twist of fate, my first day of spring break also happened to be the same day of their 2nd wedding anniversary, so they asked me not only to come visit, but to babysit for a few hours while they went out to dinner. Initially I was a bit nervous...I haven't babysat since high school and I haven't spent anytime taking care of a 4 week old baby alone. But I love babies, I was excited to see my newest relative, and I wanted the new parents to be able to enjoy their anniversary, so of course I agreed.

Before I got in the car for my trip down to San Diego, I baked up a batch of these muffins to take with me. I love baking for friends, and with new parents usually exhausted from caring for their baby, I figured they would enjoy not having to worry about making breakfast for awhile. My cousin ate one the moment he walked in the door from work, so I'm pretty confident these were a welcome treat!

The husband was a bit sad that I only left him one muffin (not that he can complain too much, since he ate all of the leftover strawberries and cream cake while I was gone!), so I baked up another batch for the two of us to enjoy. I bet these would be great with some whipped honey butter smeared inside!


Strawberry, Banana, Blueberry Muffins
Source: Adapted from this recipe, originally from Vintage Victuals
Printable Recipe

Ingredients

1 1/2 cups unbleached whole wheat flour
1 cup oats, rolled or quick
1/4 cup brown sugar, packed
1/4 cup sugar
2 teaspoons baking powder
1 teaspoon baking soda
1/2 teaspoon salt
1 teaspoon cinnamon
1 teaspoon ground flax seeds, optional
2 eggs
1/4 cup apple sauce
1/4 cup fat free sour cream or crema
1 mashed ripe bananas
1 1/2 cups blueberries, fresh or frozen
2 cups strawberries, fresh or frozen, sliced

Directions
Pre-heat your oven to 400 degrees. Spray muffin tins with non-stick spray, or line them with paper liners.

Mix the dry ingredients together in a large bowl. Set aside.

In a small bowl, mix the eggs, apple sauce, sour cream, and fruit (except for the blueberries) together.

Pour into the dry ingredients and mix with a spatula until just combined. Gently fold in the blueberries.

Fill each muffin tin about 2/3 full and bake for 17 minutes, or until a toothpick inserted in the center comes out clean.

Wednesday, April 14, 2010

Strawberry Sorbet


I actually made this sorbet before I made the kiwi sorbet--well like one day before. Strawberries were on sale for less than a $1 a pound, so I quickly scooped up 5 pounds, knowing I wanted to make the strawberries and cream cake and this sorbet.

Just like the kiwi sorbet, this was refreshing and it tasted like fresh sweet strawberries here. Be sure to use ripe strawberries or the flavor won't be as pronounced.


Strawberry Sorbet

Source: inspired by Deliciously Organic
Printable Recipe


Ingredients


2 cups sliced strawberries
1/3 cup orange honey (you can use regular honey)
3/4 cup water
juice of one lime
1/4 cup strawberry syrup (the liquid from tossing sliced strawberries in sugar)

Directions

Heat the water and honey in a saucepan, just until the honey melts.

Combine all ingredients in a blender and puree until smooth.

Chill in the freezer for 15 minutes and then freezer in your ice cream maker.

Friday, April 9, 2010

Kiwi Sorbet


I love having a Costco membership; I think we save a lot of money buying our toilet paper, paper towels, and laundry detergent in bulk. Their baby back ribs are a great price and we always run in for movie tickets before heading out to the theater. But other times, I think buying bulk is not so great. I mean there are only two of us and we can't eat ALL that food, but I hate when things go to waste.

Case in point: the 5 pounds of kiwi I recently bought. The husband loves kiwi, so last time I was at Costco I picked up a container of the fruit for him. He ate a few, but the majority of the kiwis were still sitting on the counter 2 weeks later. Luckily I stumbled upon this recipe, which I immediately bookmarked to use up all those kiwi.

The sorbet is really refreshing and fruity. It tasted kind of tart right after I churned it, but after the hard freeze in the freezer it was sweet and kiwilicious!

Check back soon for my variation using fresh strawberries. Yum!

Kiwi Sorbet

Source: Deliciously Organic

Printable Recipe


Ingredients


2 cups kiwi, peeled and chopped (about 8-10 kiwis)
1/3 cup orange honey (you can use regular honey)
3/4 cup water
juice of half a lemon

Directions
Heat the honey and water in a saucepan, just until the honey melts.

Combine all of the ingredients in a blender and puree until smooth.

Chill the mixture in the freezer for 15 minutes. Freeze in your ice cream maker according to manufacturer's directions.

Thursday, April 8, 2010

Strawberries and Cream Cake


So what did you do for Easter this year? The husband isn't Christian and I am not very religious, so we don't really have any Easter traditions--we just kind of go with the flow each year and do whatever sounds good in the moment.

This year we invited my friend and former college roommate, Cherice, along with her fiance, Kavin, over for dinner. We had a blast; while the guys drank beer and played video games, I had Cherice help me out in the kitchen, roasting chicken and a variety of veggies, mashing potatoes, and making gravy from scratch. To top off a great dinner, I served chocolate mousse and this strawberries and cream cake...with homemade whipped cream!

I think this cake might become our new Easter tradition.


Strawberries and Cream Cake
Source:
The Busty Baker
Printable Recipe


Cake Ingredients

½ cup (1 stick) unsalted butter, room temperature, plus more for pan
1 ½ cups all purpose flour, plus more for pan
2 teaspoons baking powder
½ teaspoon salt
½ cup sugar
2 large eggs, plus 2 large egg yolks
½ teaspoon pure vanilla extract
½ cup milk

Strawberries and Cream Ingredients

1 pound strawberries, hulled and thinly sliced, divided
½ cup sugar, divided
1 teaspoon unflavored gelatin (one ¼-oz envelope)
2 cups (1 pint) heavy cream
1 teaspoon vanilla extract


Directions

Preheat oven to 350F.

Butter an 8-inch round pan, and line the bottom with parchment. Butter and flour parchment and sides.

In medium bowl, sift together flour, baking powder, and salt; set aside.

Cream together butter and sugar in an electric mixer until light and fluffy, about 3 minutes. Add eggs and yolks, one at a time, beating until combined after each addition. Beat in vanilla. With mixer on low, add flour mixture and milk alternately, beginning and ending with flour. Mix until just combined.

Pour batter into prepared pan and smooth top.

Bake until a toothpick inserted in the centers comes out clean, about 25 to 30 minutes. Cool for pan 10 minutes in the pan, then invert onto a wire rack to cool completely.

When cake has cooled, make the strawberries and cream:

In a large bowl, combine half of the strawberries and ¼ cup of sugar; set aside.

Pour 2 tablespoons of cold water in a small saucepan. Sprinkle gelatin over water; let soften for 5 minutes.

Heat saucepan over low heat, stirring constantly, until gelatin has dissolved. Remove from heat and let cool slightly. (It will congeal when cooled completely, but you can dissolve it again by returning it to the heat and stirring.)

In the clean bowl of an electric mixer, fitted with the whisk attachment, beat heavy cream, vanilla extract, and remaining ¼ cup sugar until very soft peaks form.

With mixer still running, gradually add gelatin mixture; beat until soft peaks form.

Assemble the cake:

Using a serrated knife, split the cake in half horizontally.

Place the bottom half, cut side up on a serving plate. Arrange the strawberry/sugar mixture over the bottom cake layer, drizzling any juices in the bowl over top the strawberries. Don't be shy with the juices!

Top with half of the whipped cream, leaving a 1 inch border.

Cover with top half of cake. Top with remaining whipped cream.

Refrigerate cake and remaining strawberries separately, at least 1 hour, up to 1 day. Just before serving, arrange remaining strawberries on top of cake.

Wednesday, February 3, 2010

Lemon Sorbet


My parents have a small Meyer lemon tree in their backyard and whenever it is in season, the branches are laden down with the tangy fruit. They've offered me lemons in the past, but I've never really taken any...I didn't feel like I had much use for them. But then I found this recipe for lemon sorbet and immediately called, asking for some lemons.

Meyer lemons are difficult to find in the grocery store because their thin skin means they don't ship well. I did recently see them in my neighborhood Henry's (part of the Whole Foods family) for $3.00 a pound! Rather than pay that exorbitant price, I called up good ole mom and dad and asked for a bagful of lemons the next time they came over. My dad warned me that their lemons are small this year, but I said it was fine, just give me some lemons. He wasn't lying; they are tiny, about the size of a golf ball! This isn't Meyer lemons in general, just their particular crop. Even with about 10 lemons, I barely got a 1/2 cup of juice, so I had to halve the recipe below.


I've given you the full amounts, but if you don't have a lot of lemons, or don't want much sorbet, this halves easily. Also, this sorbet is really tart. If you prefer a sweeter lemon treat, I'd add another 1/4 cup of sugar. You need to do this in the beginning, with the water though, or the end result will be grainy. One last note, you don't have to use Meyer lemons for this recipe, but they are less tart than their regular counterparts. If you don't use Meyers, I would definitely up the sugar content.


Lemon Sorbet
Source: The Perfect Scoop

Printable Recipe


Ingredients
2 1/2 cups water
1 cup sugar
2 lemons
1 cup freshly squeezed lemon juice (from about 6 regular sized lemons)

Directions
In a medium, nonreactive saucepan, combine the sugar and 1/2 cup water. Zest the two lemons directly into the mixture, being careful not to add the pith. Heat, stirring frequently, until the sugar has completely dissolved.

Remove the pan from the heat and add the rest of the water. Refrigerate until completely chilled (several hours or overnight is best). Stir in the lemon juice and freeze the mixture in your ice cream maker, following your manufacturer's directions.

Monday, February 1, 2010

Ginger-Mango Chicken in Parchment


I've been cooking my way through Martha Stewart's Everyday Food-The Light Issue lately, and have really enjoyed the recipes I've tried. I was particularly intrigued by her tip on cooking in parchment, and fueled by the success with salmon cooked in parchment, I decided to give this recipe a try.

While the final results were delicious--slightly sweet, almost tropical--the recipe had one major annoyance for me. It calls for the chicken to be cooked at 400 degrees for 18-20 minutes. Well, after 20 minutes my chicken was still raw! Now, I did use boneless chicken thighs, instead of the chicken cutlets Martha calls for (I don't even know what a cutlet is!), but thighs are small, and without bones, don't usually take long to cook. I kept checking the chicken for doneness every few minutes, until it was finally cooked all the way through after 35 minutes.

Either my oven temp is off (always a possibility) or Martha just got the cooking time wrong here. Despite that annoyance, I still enjoyed this recipe and highly recommend it. The mango flavor is absorbed into the chicken and the parchment makes for easy clean up. Don't be scared by the jalapeno...it added depth of flavor without being spicy. It also helps that I removed the seeds and white membrane, where most of the jalapeno's heat resides.
Link
Ginger-Mango Chicken in Parchment
Source: Martha Stewart's Everyday Food

Printable Recipe

Ingredients
1 large mango
8 chicken cutlets (I used 6 small, boneless, skinless thighs)
1 piece fresh ginger (about 1"), peeled and cut into matchsticks
1/3 cup fresh cilantro leaves
1 medium jalapeno, thinly sliced (remove the seeds and membrane if you don't like a lot of heat)
salt and pepper
1 teaspoon extra virgin olive oil, divided (Martha actually calls for 2 Tablespoons plus 2 teaspoons, but I found 1 teaspoon to be enough)
lime wedges, for serving

Directions
Pre-heat the oven to 400 degrees.

Peel the mango and slice into bite-sized chunks. Divide the mango chunks in half, and place them in the center of 2 large sheets of parchment paper.

Top the mangoes with chicken, ginger, jalapenos, and cilantro. Drizzle 1/2 a teaspoon oil over each packet. Sprinkle with salt and pepper.

Bring the edges of the parchment up to meet in the middle, and then fold them over, creating a seam. Twist the open edges, sealing the packets shut. Place each packet on a cookie sheet
and bake for 18-20 minutes (mine actually took 35 minutes to cook).


Plate the chicken, including the cooked mango, and serve with lime wedges.

Saturday, June 6, 2009

Chocolate Strawberry Waffles


My husband loves waffles and strawberries, as do I. I also love chocolate, and would eat it for every meal if I wasn't trying to lose weight. Here I have combined the three into one satisfying breakfast. Not the healthiest way to start the morning, but perfect for a chilly Sunday morning.

Don't these strawberries look gorgeous?!

The strawberry flavor was not as pronounced as I had hoped. It was *extremely* subtle, in fact. Next time I plan to halve the cocoa powder and double the amount of strawberries. Hopefully, that will provide a more intense strawberry taste to the waffle itself.

Tip: I made the batter the night before and left it in the fridge overnight. When we woke up on Sunday morning, I just had to heat up the waffle maker and pour! Now if only someone would come over to clean my waffle maker....

Chocolate Strawberry Waffles

*Adapted from this recipe.

Ingredients
  • 2 cups all-purpose flour
  • 4 teaspoon sugar (I'm sure this could be dropped to 3 teaspoons and be just as good)
  • 2 teaspoons baking powder
  • 2 tablespoons cocoa powder (my addition. Can be omitted to make regular strawberry waffles. I might half next time.)
  • 1/4 teaspoon salt
  • 2 cups sliced strawberries, plus 2 sliced strawberries for garnish (I think I will double this next time)
  • 4 tablespoons milk (I used 2%)
  • 2 tablespoons vegetable oil
  • 1/2 teaspoon vanilla extract
  • 2 large eggs
  • Cooking spray
Directions:
Spoon the flour into a dry measuring cup and level with a knife. Pour into a medium sized mixing bowl. Stir in the sugar, baking powder, cocoa powder, and salt.

In a blender, combine the strawberries, milk, oil, vanilla and eggs. Blend until smooth.


Pour the blended strawberries into the flour mixture and stir together until just combined.

Pour about a 1/4 cup of batter onto a hot waffle iron sprayed with cooking spray and cook until the steam stops--about 5 min per waffle.

Top waffles with additional sliced strawberries, powdered sugar and syrup.


LinkWithin

Blog Widget by LinkWithin