Friday, July 31, 2009

Garlic and Lime Chicken Thighs


I am always complaining about being fat, but I don't really do a ton about it. Yeah, I go hiking every two weeks, yoga once in a blue moon (I'm hoping to change that soon though), 1 hour of cardio 2 days a week...that's really not much exercise. And then there is food. I LOVE food. LOVE.IT.

I'll eat my feelings, your feelings, and that girl who I don't even know's feelings.

Yeah, that's not so great for my waistline. At all.

So rather than whipping up another pizza tonight (don't you just love pizza?), I finally cracked open my humongous copy of The Best of Cooking Light, flipped to "poultry", and promptly found this recipe for chicken thighs. Perfect, I already have two defrosted packages of chicken thighs in the fridge (we went out for sushi last night because I was too lazy to turn the oven on), and I love me some garlic and lime juice.

This recipe reads a little funky (I scratched my head and said "what?" a few times), but it is actually really easy to prepare. Make sure you have an oven-proof skillet...this goes from stovetop to oven in one pan.

Here's to eating healthy! I tripled the recipe to make sure we'd have leftovers, but the following is the original deal.

Note: The cumin is a really strong flavor in this dish, imparting an Indian taste to the chicken, which I felt overpowered the lime. I was looking for a more citrus-y taste. Next time I will either use less cumin, or omit it completely and use a different spice in its place. My husband said it reminded him of the Pakistani food his mom served for dinner when he was a kid.

Garlic and Lime Chicken Thighs
From The Best of Cooking Light
Printable recipe

Ingredients
1 tablespoon minced garlic
1 1/2 teaspoons ground cumin
1/2 teaspoon dried oregano
1/4 teaspoon salt
1/8 teaspoon pepper
2 tablespoons lime juice, divided
4 (six-ounce) boneless, skinless chicken thighs
3 tablespoons, fat-free, low-sodium chicken broth (I was out of chicken broth, so I used vegetable bouillon)
1 tablespoon white vinegar
2 teaspoons cilantro (for garnish)

Directions
Preheat your oven to 350*. Spray a skillet with non-stick spray, and place the chicken in skillet in one layer.

Combine the first 5 ingredients in a small bowl. Add one tablespoon lime juice and stir to combine. Rub the mixture over chicken.
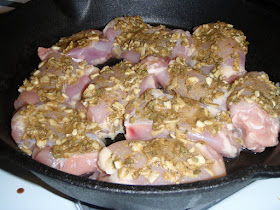


Combine the broth, vinegar, and remaining tablespoon of lime juice in a small bowl. Pour over the chicken.

Heat chicken in skillet over medium-high heat, just until the broth comes to a boil. Cover the skillet with foil and stick in the oven.


Cook for about 30 minutes, or until the meat reaches an internal temperature of 180*. (I don't have a meat thermometer, so I just used the timer.)

Remove chicken from the skillet and keep warm. Set the skillet over medium-high heat and bring to a boil. Cook until the liquid is reduced to about 1/4 cup (approximately 3 minutes).

Plate the chicken and spoon sauce over the top. Garnish with cilantro, if desired.

Serving size: 2 thighs and 2 tablespoons sauce
Nutritional Info (courtesy of The Best of Cooking Light)
Calories 326
Fat 10.4 grams
Saturated fat 2.6 grams
Monounsaturated fat 3.3 grams
Polyunsaturated fat 2.6 grams
Protein 51.1 grams
Carbs 4.8 grams
Fiber .5 grams (better eat some veggies with this!!)
Iron 4 mg
Sodium 517 mg
Calcium 59 mg

Thursday, July 30, 2009

Portabello and Pasilla Tacos with Lime Rice

I love Rubio's Mexican Grill; my favorite thing to order there is the shrimp burrito. It's so creamy and shrimpy and tasty, but now that restaurants are providing nutritional information, I've been informed that it is over 700 calories. SEVEN HUNDRED CALORIES for a burrito!!!! These new nutritional guides are both a blessing and a curse. I can't NOT read them, so now I know how much my favorite foods cost me in caloric intake, which in turn forces me to decide: eat it anyway, or find a healthier option.

Well, I can't complain about being fat if I don't do anything about it. So faced with the news that my fav Rubios option is pretty much half of what should be my daily caloric intake, I perused the nutritional guide for a better option. Mmmm, taquitos were only 270, but they're deep-fried. Salads are unsatisfying and still in the 500-800 calorie range. Then I spotted the new "gourmet" taco menu. The portobello and poblano tacos are only 170 calories each. I seriously heart me some portobello mushrooms and I am a big fan of poblanos as well, so I promptly ordered 3 tacos. Hmmm, let's do the math here: 170 x 3 = 510 calories. Not exactly a lite lunch, but I stayed away from the chips, rice, beans, and was satisfied.

Here is my homemade version.


Portobello and Pasilla Tacos
This makes enough for about 3-4 tacos.
Printable recipe

Ingredients
3 large portabello mushrooms, stems removed, caps washed
1 large pasilla pepper (I couldn't find a poblano or I would have used that)
3 cloves garlic, diced
corn tortillas
shredded reduced fat Mexican-blend cheese
2 tablespoons crema
3 tablespoons fire roasted tomato salsa
salt and pepper to taste
1 teaspoon olive oil
1 lime

Directions
Combine the crema and salsa together in a small bowl. Set aside.

Roast the pasilla pepper until charred, either in the oven or over an open flame. Scrape the blackened skin off the pepper and discard. Chop the pasilla into large chunks, removing the seeds if you don't like a lot of heat, and set aside.

Cut the portobellos into thin slices. Heat the olive oil in a medium saucepan. Add the mushrooms and garlic and saute until soft and garlic is fragrant. Season with a sprinkle of salt, a generous dash of pepper, and the juice of one lime.

Heat the tortillas, sprinkle with a small amount of cheese and top with mushrooms and peppers. Spoon a drizzle of the crema salsa on top and serve with lime rice (see below).


Lime Rice

Ingredients
1 cup rice
2 cups water
2 limes
1/2 teaspoon garlic powder

Directions
If you have a rice cooker, throw the rice and water in the cooker, put the lid on, and turn it on.
If you don't have a rice cooker, go get one. Okay, fine. Bring the water to a boil, then add the rice. Continue cooking and stirring, over medium-low heat, until the water has nearly evaporated. Cover the pot with a lid and turn the heat off. Leave the lid on to trap the steam for at least 10 minutes.

Once the rice is cooked, squeeze the juice of one lime over the rice. Sprinkle the garlic powder over the rice. Stir the rice to coat all grains with garlic and lime juice. Taste. Decide what you think....add the juice of another lime if you want a stronger citrus taste, or don't. It's your food, you decide.

Nutritional Information (Tacos Only)
Note: This is edited from the original posting to include the cheese, which I previously omitted (accidentally!!).

Calories 168.6
Total Fat 6.1 g

Saturated Fat 2.5 g

Polyunsaturated Fat 0.5 g

Monounsaturated Fat 2.0 g
Cholesterol 11.2 mg
Sodium 1,072.2 mg
Potassium 901.9 mg
Total Carbohydrate 17.2 g

Dietary Fiber 4.7 g

Sugars 3.2 g
Protein 14.3 g

Tuesday, July 28, 2009

Pizza


Ever since I bought my pizza stone and began experimenting with different yeast dough recipes, I haven't had the desire to buy a takeout pizza. Why would I, when in the same amount of time I can make a just as tasty pizza for pennies on the dollar and a much lower calorie intake?

Sorry local pizza joints, but I am ordering in from Janet's pizza kitchen tonight.

Pizza--Turkey Pepperoni, Tomatos, and Bell Pepper

My current favorite crust is the Olive Oil Dough, but I have also used this whole wheat dough in the past.

Pre-heat the oven to 550 degrees (500 if fine if that's as hot as your oven will go), with the pizza stone inside. Rack position doesn't really matter for pizza. Be sure to heat your pizza stone for at least 30 minutes so it is nice and hot....this is how you achieve that nice crispy, pizzeria crust at home.

Meanwhile, sprinkle a generous amount of cornmeal on a large piece of parchment paper. This will help keep your crust from sticking.

Grab a hunk of dough from your homemade refrigerated dough (make it earlier in the week and it will be ready for you whenever the pizza craving strikes) and begin spread and stretching it out on the parchment paper. If you like a thin crust, stretch it until it is about a 1/4" thick. If you like a thicker crust, don't stretch the dough so much.

Note: Lightly flouring your fingers or spreading a small bit of cornmeal on the top edge of he dough helps keep the pizza dough from sticking to your hands. This will make it easier to work with.

Once you've spread the dough out to your desired thickness, size and shape, spoon your favorite pizza sauce all over the top. Spread it to about 1/4" to 1/2" away from the edge. The more dough you leave uncovered, the more pizza crust you will have. I personally love the crust, but maybe you don't. That's the good thing about homemade pizza...you can decide everything!

Once your dough is covered in sauce, load it up with some shredded mozzarella cheese, diced tomatos, diced bell pepper and turkey pepperoni.

Pop that bad boy into your preheated oven, on top of the pizza stone (I leave my pizza on the parchment, and place that onto the stone while it bakes). Cook for about 8-11 minutes, or until your crust is golden and the cheesy is melted and bubbly.

Remove your pizza from the stone with a large spatula, but leave the pizza stone in the oven to cool. Let cool slightly and then enjoy!

Chock Full O Veggie Pizza and Pasta Sauce


I had a bunch of summer squash sitting on my counter, left over from a recent CSA basket. I have received 5-7 summer squash every week since the first Wednesday in May; Let me tell you, I am so incredibly tired of zucchini, patti pan, and yellow crook-neck squash, that if I never see them again it will be too soon. But, I don't want to waste pounds of perfectly edible food that I paid for just because the thought of it puts my taste buds to sleep. It also doesn't help that my husband doesn't like any of the aforementioned veggies.


Great.

Time for some kitchen deception. I pulled out the food processor, washed and de-seeded all the squash, and quickly shredded them. Perfect for hiding in....pizza sauce. Yes, pizza sauce.

Simmer some tomato paster, herbs, garlic, and all that shredded squash, and voila, a tasty and healthy pizza or pasta sauce. Pizza for dinner with several servings of real nutrition. Whodda thunk it?

Note: I don't have kids, but I do have a picky husband, and he loves this sauce. So if you have picky eaters at home (kids, husband, yourself), whip up a small batch of this sauce and give it a try. You may just have a new way to actually eat those dreaded vegetables.

This recipe makes a ton of sauce, which I like to then dump into a ziplock bag, and store it in the freezer. You can easily halve or quarter this recipe as needed.

Pizza/Pasta Sauce
(my own concotion)
Printable recipe


Ingredients
3 cans tomato paste, plus 1 1/2 cans water to thin out
6-8 tomatos
1 onion, shredded (food processor)
4-6 squash, any variety is fine, shredded (food processor)
1 handful fresh basil leaves, torn (or 1-2 tablespoons dried)
1 small handful fresh oregano leaves, torn (or 1 tablespoon dried)
4 fresh sage leaves, torn
4 garlic cloves, diced
1-2 teaspoons red pepper flakes
1- 2 teaspoons salt
2 tablespoons pepper

Directions:
Combine all ingredients in a large pot and bring to a simmer.

(For the tomatos, you can either chop or dice them, or simply just squeeze/smash them into the tomato sauce. I do both; squeeze about 3/4 into the sauce, and then chop the remaining tomatos into large chunks to mix in as well.)

Stirring occassionaly, simmer for 20-30 minutes. This allows the vegetables to cook, while also combining the various flavors. Taste after about 15-20 minutes and add more seasoning as desired.


Spread on your pizza crust and top with cheese and other goodness, or smother a mound of spaghetti in this veggie-rific sauce. Have another way you'd use it? Leave me a comment and let me know!

Tuesday, July 21, 2009

Olive Oil Dough

I love using this recipe to make pizza crust. I haven't tried making a loaf of bread from it yet, but I have made several pizzas to rave reviews from my husband.

This is a very wet and sticky dough. Keep that in mind when stretching it out for pizza; I tend to flour my hands a bit, or use extra cornmeal on the parchment paper.

This makes a lot of dough...I tend to get about 4ish pizzas out of one batch of dough. The original recipe states that it makes 4 one-pound loaves of bread. I recommend making this dough a day in advance of using it as it is easier to work with it when it it cold. The additional time in the fridge also helps the dough to develop mire intensity in flavor.


Olive Oil Dough

From Artisan Bread in 5 Minutes a Day

Ingredients
2 3/4 cups lukewarm water
1 1/2 tablespoons active yeast (1 1/2 packets)
1 1/2 tablespoons salt
1 tablespoon sugar
1/2 cup extra virgin olive oil (use a high quality olive oil...it lends a better test to the final product)
6 1/2 cups unbleached all-purpose flour

Directions
Combine the first 5 ingredients in the bowl of your stand mixer using the paddle attachment. (You can mix by hand in a large bowl if you don't have a stand mixer. But....just go buy a Kitchen Aid stand mixer and make life in the kitchen easier).

Change the attachment from the paddle to the dough hook. Gradually mix in the flour, with the machine set to medium, until all the flour is incorporated. Make sure there is not any flour left hiding under the dough.

Cover (either in the mixer bowl or in another clean bowl) and leave to rest at room temperature until the dough rises (about 2 hours).

Use the dough right away for pizza, bread, calzones, etc or refrigerate in a covered bowl. Best used within two weeks.

Sunday, July 19, 2009

Chicken Gyros with Cucumber Salsa

I feel like I have been on a culinary world trip lately, with my recent foray into sushi-making, tzatziki dip (Is it Greek or Middle Eastern? Ah, delicious either way), my love of Mexican cuisine, and the recent garden0fresh pasta.
Continuing in that vein, and with that huge batch of tzatziki dip on hand, I decided to whip up some chicken gyros for dinner the other night. This is a really easy dish that can be made with an entire roast chicken, or just a couple of chicken breasts if there are only two mouths to feed.


Chicken Gyros with Cucumber Salsa
Adapted from Epicurious

For the chicken:

2 boneless skinless chicken breasts
1 tablespoon olive oil
3 cloves garlic, diced
1-2 tablespoons fresh oregano, roughly chopped
3 sage leaves, roughly chopped
1 tablespoon fresh rosemary
salt and pepper to taste (about 1/4 teaspoon of each)
6 pita pockets

For the cucumber salsa:

Juice of 1 small lemon
4-5 tomatos
1 cucumber
1 tablespoon flat leaf parsley, roughly chopped
salt and pepper to taste

Cucumber Salsa:
Dice the cucumbers and tomatos and combine in a medium bowl. Add chopped parsley, lemon juice, salt and pepper. Stir to combine. Refrigerate until ready to serve with gyros.

Chicken:
Roast or boil the chicken (in broth) until done. Shred into bite-sized pieces and set aside.

Heat oil in a medium saucepan. Add oregano, rosemary, sage leaves, garlic, salt and pepper. Stir constantly, until the garlic is golden and fragrant. Toss shredded chicken with the herbed oil.


Fill pita pockets with herbed chicken and top with tzatziki dip and cucumber salsa.

Saturday, July 18, 2009

Sushi: Spicy Tuna Rolls


Friday night in my household means one thing: Sushi at our local sushi joint. Well, quasi-local....it's kind of a chain. But they have great rolls at the best prices. We love to pull up a seat at the sushi bar and watch the chefs work their magic, while hopefully catching a game on their TVs. However, the service there is less than stellar; wait forever to get a drink refill, wait an eternity for the server to pick up the tab from the sushi chef, another lifetime for them to bring us the check, what feels like hours for them to come get the check from us, and then just when you are in the home strech and only need to sign the bill...WHERE is the waiter?

Why can't we just get some good sushi without the hours wait just to pay them for the food? We have semi-resolved this by sitting at the regular bar or just ordering food to go. This Friday night I opted to go an entirely different route: I attempted homemade sushi.

I also learned that there are A LOT of different kinds of rice out there and jasmine rice is not the same as sushi rice. And there is not a single bag of rice labeled "sushi rice" at any market around me, including the Asian grocery store. (For the record any short grain rice, such as sweet rice, will do.)

Spicy Tuna Rolls
*Note: You will need a bamboo mat for this. I picked one up at my local Asian market for about a $1.25.

Ingredients for the rolls
3/4 lb. ahi tuna
1/2 cucumber, thinly sliced
1/2 avocado, thinly sliced
2 sheets nori (dried seaweed)
1 tablespoon chili past
3 tablespoons mayo

Ingredients for the rice (courtesy of Alton Brown)
3 cups sushi rice, uncooked
3 cups water
3 tablespoons rice vinegar
3 tablespoons sugar
1 1/2 tablespoons salt

To make the rice:
(Alton Brown has a great video demonstrating how to make sushi rice.)
First, rinse the rice in cool water several times, until the water is clear.

Combine rice and water in a large pot and bring to a boil, uncovered. Once the water is boiling, turn the heat to low and cover. Let cook, with the lid on, for 15 minutes. After 15 minutes, leave the lid on and turn the heat off. Lets sit undisturbed for 10 minutes.

In a small bowl, combine rice vinegar, sugar and salt. Microwave for 30 seconds to help the vinegar absorb some of the sugar and salt. (Note: It will not absorb all of the sugar and salt.)


Transfer rice from cooking pot to a large wooden or glass bowl (I used plastic as I don't have either a glass or wooden bowl. Don't use a metal bowl!). Pour the vinegar, salt and sugar over the top of the rice and cut and fold the rice with a serving spoon. You want to coat all grains of rice with the vinegar mixture, while also cooling the rice down.

Continue stirring the rice or use a paper plate to fan it, bringing the rice to room temperature.

For the rolls:
In a small bowl, mix together the mayo and chili paste. (Omit if you just want regular tuna, instead of spicy tuna rolls.) Set aside.


Unroll the bamboo mat so it is flat. Spread rice on the mat and cover with 1/2 a sheet of nori. You can also lay the nori down first and spread the rice on top. Either way is fine: do you like your rolls with rice out, or seaweed out?


See the rice under the nori?

Once you've spread the rice out and covered with nori, lay a piece of tuna down the middle. Add pieces in one layer until they make a line from top to bottom on the nori. Spread a layer of chili paste/mayo on top of the fish. Top with slices of avocado and cucumber.


Using the bamboo mat, gently roll the sushi together. (I found I needed to add some rice along the seam to make sure the roll did not unfold.) Gently squeeze the sushi through the mat once it is rolled up.


To cut, dip your finger tips and the knife blade in water. This helps prevent the rice from sticking.

Serve with wasabi, soy sauce and lightly salted edamame (soy beans).

Thursday, July 16, 2009

Tzatziki Dip

I have been receiving several cucumbers in my CSA (community supported agriculture) baskets lately, including a really long, striped cucumber. I have no idea what this type of cucumber is called, but look at how big it is!


My husband doesn't like cucumbers, so I am limited in their use. But I do LOVE me some tzatziki dip after discovering it at Trader Joe's a few years ago, and I have been craving it lately, so what better to do with the gargantuan cucumber? Make some dip! This is great on pita chips, pita pockets, pretzel chips, or as a veggie platter dip. It's a SUPER easy and tasty treat, especially in the hot summer days.

I asked one of the girls on The Nest for her recipe and then modified it to my tastes. I've posted my recipe below, but check out The Rookie Chef for her recipe.

Tzatziki Dip

(also known as cucumber and yogurt dip)

17.25 ounces Greek Yogurt (about 2 1/4 cups)
1 cucumber
Juice of 1 lemon
6 cloves garlic, diced
salt and pepper to taste

Cut the cucumber up into thin slices (no need to peel the cuc first). The first time I made this I used my box grater to get super thin slices. You could also use a food processor. However, a knife works fine....don't worry about getting them super thin.

Squeeze out the liquid from the cucumber slices.

Combine all ingredients together in a small bowl and stir until totally mixed. Taste your dip and add more salt, pepper, lemon, garlic as preferred.

Refrigerate for at least an hour to meld all of the flavors together. Serve cold with pitas, veggies, pretzels, or whatever you like to dip!

Monday, July 13, 2009

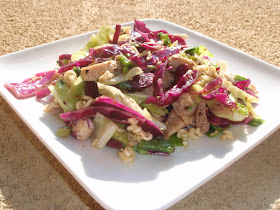
Sumi Salad


This is a great entree salad for those summer days when it is just too hot to actually cook. I have no idea why it is called sumi salad, but this has been one of my favorite dishes for as long as I can remember.

The recipe comes from my mom....no idea where she got it from. I am posting the exact recipe that she sent me, with my changes noted in italics. You can omit the chicken for a vegetarian recipe.

Note: This makes a TON of food. Easily enough to serve 6 people with leftovers. You can half the recipe, but it is great a day or two later as leftovers for lunch.

Sumi Salad

2 chicken breasts
2 tablespoons oil
¼ cup sesame seeds
1 head cabbage, finely shredded (I used half green and half purple cabbage)
Two packages ramen noodles, uncooked (chicken or oriental flavor is best)
¼ cup sliced or slivered almonds (I omitted the nuts)
8 green onions, including the tops, finely sliced
1 avocado diced, optional
1 Anaheim (or poblano) pepper , optional


Boil the chicken breasts in water or broth until cooked through. Drain and shredded chicken into bite sized pieces.

Roast the Anaheim pepper over a flame or in the oven, until charred. Scrap off the blackened skin, remove the seeds, and dice.

Heat oil in small skillet and toast almonds and seeds until lightly browned. Be sure to stir often.
In a large bowl combine the onions, cabbage, Anaheim pepper, chicken, almonds, sesame seeds, and ramen noodles (broken into small pieces).

Pour the dressing (recipe below) over the salad and toss well. Cover and chill several hours or overnight before serving.

Dressing

¼ cup sugar
1 teaspoon salt
6 tablespoons rice vinegar
1 teaspoon black pepper
1 cup oil (I used olive oil) Edit: I recently tried using less oil and found it tastes just as good. My reccomendation is to start with 2/3 cup of oil and taste once everything is combined.
One package of seasoning from the ramen noodles

Combine all dressing ingredients and mix well. (Mom's note: I like to use a jar so that I can shake things up.) Pour over salad and toss.

Wednesday, July 8, 2009

A Fresh Take on Pasta


I really wanted to make the Szechaun noodles from Annie's Eats the other day, but as I read through the ingredient list, I realized I was missing at least 7 ingredients. Combine that with my husband's distaste for peanut butter (a prominent flavor in the dish), I decided to save that for some other time. But I was craving some kind of noodle dish, so I started pawing through my pantry to see what I could come up with. Here is my creation, with a bit of inspiration off the side of the pasta box. :)

This is great hot or cold. We ate all of it right away! This is another recipe to be added to the "rotation", according to my husband. Feel free to substitute the veggies for your own personal tastes or whatever is in your kitchen/garden. You can also omit the chicken for a vegetarian dish.

Garden Pasta
2 chicken breasts
3 tomatos, chopped
2-3 garlic cloves, diced
1 bell pepper, chopped
fresh basil, about 7 leaves torn
1-2 teaspoons dried oregano (you can use fresh too)
2-3 teaspoons pepper
1 1/2 tablespoons extra virgin olive oil
thin spaghetti (I just eyeball it and use however much I think we'll eat. I like to use the Barilla Plus, but you can use whole wheat or regular pasta too.)
2 cans vegetable broth (I only had one can, so I added about 6 ounces of water to the broth. Worked just fine)

Directions:
Bring the vegetable broth to a boil. Add the chicken to the boiling broth and cover. Boil until cooked through.

Once the chicken is cooked, remove it and place on a plate or bowl. SAVE the broth!!! Shred the chicken and set aside.

Bring the broth to a boil again and add the pasta. Cook about 7-8 minutes. (Since I only used one can of broth, my pasta absorbed all the broth, and the rest evaporated, leaving no liquid in the pan at the end. Watch your pan to make sure the pasta doesn't burn if this happens to you. Mine was totally fine.)
Cooking the chicken and pasta in broth imbibes more flavor into the two ingredients, resulting in a tastier dish than if just cooked in water. You can use chicken broth instead, if you'd like. Using the same broth to cook the chicken and pasta, gives another layer of flavor to the pasta as well.

While the pasta is cooking, heat 1 1/2 tablespoons olive oil in a sauce pan. Saute the garlic until golden and fragrant. Add the tomatos and saute for about two minutes. Set aside.

Once pasta is cooked and drained, combine in a large bowl with the shredded chicken, sauted tomatos and garlic. Toss to coat the pasta and chicken with olive oil. Add in the diced bell pepper, torn basil leaves, oregano, and pepper. Toss once more and serve.


Note: I am trying to limit my sodium intake, so there is no salt in this recipe. Feel free to add salt to your taste. This would also be great with some parmesean cheese sprinkled on the top.

Carrot Cake

My parents recently celebrated their 34th wedding anniversary (7-5-75) and my dad wanted to surprise my mom with an anniversary dessert. My mom is a wonderful baker, who regularly wins awards in various baking competitions, so she is always the one to make treats for special occassions. She even made the cheesecakes that we had instead of cake at our wedding.

Since my mom is the baker, my dad thought it would be a nice treat for him to give her an anniversary cake. While he is a kick ass chocolate chip cookie baker, he hasn't really ever baked any other desserts, so he gave me a call and asked for help. We quickly decided on carrot cake, and I set out looking for recipes.

My dad told me "nothing fancy", but I did decide to make a layer cake. I had never made one before and really wanted to try it out. I was very happy with the results. I used a simple cream cheese frosting to layer and frost the cakes. I wanted the *perfect* carrot cake recipe, and judging from my parents' reactions (and licking the batter from the spoon), this is it.

I did sub out some of the oil for applesauce. I feel its an easy way to add a healthier aspect to recipes and helps make cakes/muffins/etc really moist and tasty.


Carrot Cake

Recipe adapted from Smitten Kitchen

Makes one two-layer cake

2 cups all purpose flour
2 teaspoons baking soda
1 teaspoon salt
2 teaspoons ground cinnamon
1/2 teaspoon ground nutmeg
1 teaspoon ground ginger
2 cups sugar
1 1/4 cups canola oil (I used 3/4 cup unsweetened applesauce and 1/2 cup vegetable oil)
4 large eggs
3 cups grated peeled carrots (about 4-5 carrots) [I grated them in my food processor and used about 3 1/4 cups]
1 cups coarsely chopped walnuts (optional)
1/2 cup raisins (optional)

Preheat oven to 350 degrees.

Butter two 9inch cake pans. Line the bottoms with wax paper (parchment paper worked fine for me) and butter the paper. Lightly flour the bottom of each pan, and tap out the excess.

Whisk together flour, baking soda, salt, cinnamon, nutmeg and ginger until blended. Whisk sugar and oil together in a separate large bowl until well blended. Whisk in eggs into the sugar and oil mixture, one at a time.

Pour the sugar/egg/oil mixure into the dry ingredients and mix until blended (I used my Kitchen Aid stand mixer). Stir in carrots, walnuts and raisins, if using them. Divide batter among the two cake pans. Bake for about 35-40 minutes, or until a toothpick inserted in the center comes out clean. (I cooked mine for 40 min and they came out pretty dark, but were still incredibly moist and felt springy.)

Cool cakes in pans 15 minutes. Turn out onto racks. (I cooled them in their pans overnight, as I didn't want to frost them until the next day.)

Peel off waxed paper; cool cakes completely before frosting.

Cream Cheese Frosting

2 packages cream cheese (8 ounces each)

2 cups powdered sugar

1 teaspoon vanilla

1 stick unsalted butter, room temperature (make sure you butter is room temp, so it gets fully incorporated into the cream cheese


Combine all ingredients together in a stand mixer and beat until thoroughly mixed together. Once ingredients are mixed, I like to switch from the paddle beater to the whisk attachment, and beat for another 1-2 minutes to incorporate more air into the mixture, making a light, fluffy frosting.


To assemble & frost layer cake:
Turn out one cake onto a cake board (I bought a 10 pack at Michaels for about $5.50). Don't forget to peel off the wax paper before setting on the board.

Using a leveler, spatula, or butter knife, spread a generous layer of frosting over the top of the cake. Place the second cake on top of this layer of frosting.

Spread the frosting on the top layer of the cake and smooth. Begin frosting the sides of the cake, turning the cake board as you go. Fill the in any space left between the two cakes. Using your knife/spatula/leveler, smooth the frosting around the sides and on the top, taking care to cover any remaining exposed cake.