Wednesday, March 31, 2010

Teriyaki Turkey Burgers


"I paid the bank note, the car note, an' yes, I paid the 'phone bill too.
An' then I turned around an' I found that the house note's due.
Well, I'd love to take you out like I said I would, honey,
But there's too much month at the end of the money."

If you listen to country music, like I do, you might be familiar with that song by Marty Stuart. I used to feel like there was "too much month at the end of the money" pretty frequently, but now that the husband and I have been paying off our debt and working with a monthly budget, I no longer worry about stretching our pay checks to the end of the month. I know we will have enough to pay all the bills, save, and have some fun money, no problem.

Except this month we didn't do such a great job sticking to the budget. And now we're about a week away from the end of the month and the bank account is running on empty. So if I want to put gas in my car in order to commute to work, I can't spend any money on groceries. Time to be creative! I consider my kitchen to be "empty" if I can't get to the grocery store twice a month, and while we may be severely lacking fresh vegetables, we are far from without food. I knew we had a half-full jar of pineapple teriyaki sauce in the fridge, a can of pineapple rings in the pantry, and lots of ground turkey in the freezer, so threw these ingredients together and created a teriyaki burger. The husband and I both love burgers, and he loves pineapple--in fact, he always orders the teriyaki burger when we go to Islands--so I knew this would be a hit. And I was right!

We used whole wheat buns, but we also like sandwich thins when we want to save some calories. I served these burgers with homemade fries.


Teriyaki Turkey Burgers
Source: A Cooking in Cucamonga Original
Printable Recipe

Ingredients
1 pound ground turkey
1 20 ounce can pineapple rings
3 Tablespoons pineapple teriyaki, plus more for dressing your burger
hamburger buns
sharp cheddar cheese, if desired

Directions

Prepare a charcoal grill, or heat a grill pan.

Dice two pineapple rings and mix into the ground turkey, along with the pineapple teriyaki sauce.

Form the meat into even-sized patties (I made 6 small patties), making sure the middles are not much thicker than the edges.

Grill the patties on each side about 4 minutes, or until cooked all the way through. Grill the remaining pineapple rings for about 2-3 minutes per side.

Toast the buns while the meat is cooking. Top each bun with a patty, a thin slice of cheese, a pineapple ring, and a drizzle of pineapple teriyaki.

Enjoy!

Tuesday, March 30, 2010

Grilled Rosemary Chicken Thighs


I came across this recipe from Pink Parsley Catering recently and immediately bookmarked it. I love grilling chicken thighs and the marinade sounded delicious. Well, just like everything I've made from Pink Parsley, this was fabulous! The flavors melded together perfectly, with none overwhelming the others.
The marinade is slightly sweet because of the honey, but the rosemary and red vinegar round out the savory end of the flavor spectrum here. That, combined with a slight char from the grill, created a wonderful entree. The husband even commented that it was too bad I didn't make more, and he rarely wants seconds! This might even be our new favorite chicken recipe, which is saying a lot considering how often we eat chicken.
I love chicken thighs because they are still a lean meat, even if they are a bit fattier than breasts, and they are incredibly moist and flavorful. So if you normally eat chicken breasts, I suggest you give boneless, skinless chicken thighs a try soon. You might be surprised at how tasty they can be!

Grilled Rosemary Chicken Thighs
Source: Pink Parsley Catering
Printable Recipe


Ingredients
2 garlic cloves, minced
1 Tablespoon extra virgin olive oil
2 Tablespoons dijon mustard (I used Grey Poupon's coarse ground mustard)
2 Tablespoons honey
1 teaspoon red wine vinegar (you can sub apple cider vinegar)
1 teaspoon salt
1 teaspoon chopped fresh rosemary (I used 1 1/2 teaspoons dried)
1 1/2 pounds boneless, skinless chicken thighs, trimmed of excess fat
1/2 lemon (I omitted)

Directions

Combine the garlic, oil, mustard, vinegar, honey, salt, and rosemary in a large ziploc bag. Add the chicken and turn to coat. Allow to marinate chilled for at least one hour or up to 24 hours.

Prepare a charcoal grill. Grill chicken thighs 3-4 minutes per side, or until they reach an internal temperature of 165.

Remove from grill and cover with aluminum foil. Allow to rest 10 minutes, to reabsorb the juices.

Serve and enjoy!

Monday, March 29, 2010

Crispy Coconut Tofu Nuggets


The husband and I enjoy eating tofu, both as an addition to a dish, as well as a main entree. I've only recently felt confident in my tofu cooking abilities, and have finally discovered the secret to making it crispy and flavorful, without deep frying it. I learned this secret from Cara's Cravings (press out the water and bake at a high temperature) and her blog has become my go-to source for tofu recipes.

So when I saw this one for coconut tofu I knew I wanted to try it; the only hurdle was the husband-he is not a huge fan of coconut. But finally I decided just to make it and let him deal, which turned out to be a great idea--he loved it and told me I should definitely make it again. Yay for tofu!

We dipped out nuggets (think chicken nugget, but tofu and not a fried breading) in pineapple teriyaki sauce, which was a perfect pairing; I think plum sauce would work well, too. Next time I plan to marinate the tofu in coconut milk to add some extra flavor. I'll let you know how that goes.

Crispy Coconut Tofu Nuggets

Source: Cara's Cravings
Printable Recipe


Ingredients
1 block firm tofu (I used a 1 lb. package)
2 egg whites
1/2 cup panko breadcrumbs
1/4 cup shredded coconut
zest of one lime
salt and pepper

Directions

Pre-heat your oven to 375 degrees.

Wrap the tofu in paper towels and place it on a plate. Set several heavy cans or books on top of the covered tofu to squeeze out the water. Let sit for 20-30 minutes.

Set a cooling rack on top of a baking sheet, and spray with nonstick cooking spray.

Pour the egg whites into a shallow dish. On a separate plate, mix together the panko, coconut, and lime zest.

Slice the tofu diagonally into two large triangles, then slice again to create two smaller triangles.
Season the tofu wedges with salt and pepper. Dip each one into the egg, then dredge in the panko mixture and set on the cooling rack.

Bake for about 25-30 minutes, turning halfway through, until lightly browned and crispy on both sides.

Friday, March 26, 2010

Homemade French Fries


I recently made burgers for dinner and wanted to serve a side of fries with them, as well. I remembered oven-baked fries on Annie's Eats, so of course I headed over to her blog and pulled up this recipe.

These fries take a bit of time, but they are worth it. They came out really crisp and tasty; the husband even said they were better than fast food fries. I think he was lying, because oven fries will never be as good as McDonald's fatty goodness, but I'm glad he thought they were good.

You could easily change the seasoning on these to suit your mood: season salt, cajun seasonings, garlic salt, etc. I dipped my fries in mustard, while the husband reached for a bottle of ketchup (yuck!).


Homemade French Fries
Source: Adapted from Annie's Eats

Printable Recipe

Ingredients

2 russet (baking) potatoes
2 tablespoons vegetable oil
salt and pepper

Directions
Pre-heat the oven to 475 degrees.

Scrub the potatoes clean and slice them into thin wedges. (You can peel them first, but I like mine with the skin on.)

Soak the potato wedges in a bowl of hot water for 20 minutes. Drain the water and place the potatos on paper towels, for about 10 minutes, to absorb excess water.

Dry the bowl you soaked the potatoes in, pour in the oil, and add the potatoes. Season with salt and pepper; toss or shake to ensure all the potatoes are evenly coated.

Place a cooling rack on baking sheet and place the potato wedges in one layer on the cooling rack. Cover the baking sheet with foil and bake for 5 minutes.

Remove the foil and bake for an additional 10 minutes. Turn the potato wedges over and bake for 10-15 minutes, or until the wedges are golden brown and crispy.

Serve with ketchup, or mustard, as I prefer. :)

Tuesday, March 23, 2010

Tomato Shrimp Pasta


This was supposed to be a pesto shrimp pasta recipe, riffing off of this recipe, but as the pasta was cooking, I realized I was out of pesto. :( I didn't want to make a run to the grocery store to buy more, so I decided to improvise and whip up a quick tomato sauce instead.
I was really happy with the way it turned out and would definitely make it again. While the pasta is cooking, butter some rolls, sprinkle with garlic salt, and place under the broiler for quick garlic bread.

Tomato Shrimp Pasta Source: a Cooking in Cucamonga original Printable Recipe Ingredients
3 cups twirly pasta
2 cups peeled, uncooked shrimp
1 can stewed Italian tomatoes
1 can tomato paste
salt
pepper
1 tablespoon dried basil
1/2 -1 teaspoon crushed red pepper
3 cloves of garlic, crushed.
1 tablespoon olive oil
grated Parmesan cheese

Directions
Bring a large pot of water to a boil. Cook the pasta to al dente (mine took about 8 minutes).

Remove the pasta, but reserve the water. Boil the shrimp in the pasta water, for about 2 minutes, or just until the shrimp is completely pink. Remove the shrimp, reserving about 2 cups of the cooking water.

Heat the olive oil in a large sauce pan. Once the oil is hot, add the crushed garlic and saute for about a minute. Add the tomato paste, stewed tomatoes, salt, pepper, dried basil, and crushed red pepper. Bring to a simmer and add 1/2 cup of the pasta water at a time, until the sauce has reached your desired consistency.

In a large serving bowl, combine the pasta and shrimp and toss with the tomato sauce. Garnish with Parmesan cheese.

Monday, March 22, 2010

Citrus Marinated Grilled Chicken


I whipped this dish up on the spur of the moment recently and was really pleased with the way it turned out. The husband commented that it has just the right amount of lime and garlic, with none of the flavors overwhelming the overall dish.
I am excited to make this chicken again soon, especially with the weather nice enough to grill every day. We served it with avocado slices and gussied up instant potatos (gasp!).

Citrus Marinated Grilled Chicken
Source: A Cooking in Cucamonga original

Printable Recipe

Ingredients

5-6 small boneless, skinless chicken thighs
3 limes
2 garlic cloves, minced
2 green onion, diced (white and green parts)
dash salt
1-2 teaspoons pepper
1 teaspoon chili powder
dash garlic salt
1 green onion, green part only, diced for garnish

Directions
Squeeze the lime juice in a medium bowl. Mix in the garlic, onion, salt, pepper, chili powder, and garlic salt. Add the chicken to the marinade; turn the chicken over a few times to ensure it is completely covered by the marinade.

Cover and marinate in the refrigerator for an hour.

Heat a charcoal grill (a grill pan would work too, but you'll lose the grill flavor). Once the coals are ready, place the chicken on the grill and cover for 3-4 minutes. Turn the chicken over and finish grilling until the meat reaches 165 degrees.

Plate and sprinkle with the diced green onions.

Friday, March 19, 2010

Chocolate Mousse


The husband has been asking for "something chocolate" lately. He doesn't care what it is....brownies, cake, ice cream....as long as it's chocolate. We finish dinner, clear off the table, comment on how disheveled the kitchen is, and then it comes; "I want something chocolate. Like cake. Or something else." Then he rummages through the cabinets, which contain next to no snack foods, and pulls out the only chocolate we have: chocolate-covered raisins. When you are craving a chocolate snack, chocolate-covered raisins are not the fix.

After browsing through my favorite blogs, I came across this recipe for chocolate mousse. With an easy dinner planned, I decided this would be a delicious and nearly effortless weeknight dessert. As soon as I got home I washed all the dishes piled up in the sink, wiped down the counters, and got to work, finishing just as the husband walked in the door, beat down from a rough day at work. But I think the chocolate helped take the edge off.

Well, that and a nice glass of beer. But I still think this richly decadent chocolate is what really did the trick.


Chocolate Mousse
Source: Annie's Eats
Printable Recipe

Ingredients
7 ounces semi-sweet chocolate, finely chopped
3 tablespoons water
4 eggs, room temperature, whites and yolks separated
pinch salt

Directions
Combine chocolate and water in a saucepan and melt over a pot of simmering water. Stir until the chocolate is nearly melted. Remove from the heat and stir the chocolate until smooth. Set aside to cool to room temperature.

Pour the egg whites and salt into the bowl of your kitchen aid mixer and whip on high with the whisk attachment until they form stiff peaks. This will take a few minutes.

Pour the egg yolks into the cooled chocolate, gently stirring to combine.

Gently fold in 1/3 of the egg whites, just until combined. Fold in the remaining egg whites, just until no white streaks remain.

Chill until you are ready to serve.

Thursday, March 18, 2010

BBQ Ribs


This isn't really much of a recipe, per se. It's just the way I cook ribs. But my ribs always come out succulent, meaty, flavorful. The key here--don't add any barbecue sauce until just before the ribs are ready to come off the grill. That, and you must use a charcoal grill. Seriously, get rid of your propane contraption; that is not really barbecuing. Trust me, it's the best way.

BBQ Baby Back Ribs
Source: my own trial and error over the years with advice from the parents Printable Recipe

Ingredients

baby back ribs (I use a rack and a half from Costco for the two of us)
salt
pepper
dry rub, if you want
your favorite bbq sauce
a charcoal grill

Directions
Tear up some newspaper and layer it in the bottom of your charcoal grill. Pour the briquettes on top into a pile. Squirt some lighter fluid on top and light the newspaper. Leave the lid off and wait.

Rub your ribs with salt and pepper, or the dry rub. Do not add any BBQ sauce yet! Let them sit while the charcoal gets hot.

The flames will die down, but the charcoal is not ready yet. Wait until the briquettes have changed from black to ashy grey. Now they're ready.

Lay the ribs on the grill; I prefer to have mine meaty side up. Put the lid on the grill and leave it alone for the next 20 minutes.

Go drink a beer and watch TV or make some side dishes.

Flip the ribs over, meaty side down, for about 3-5 minutes with the lid on.

Go drink more of your beer or chat with the friends you've invited over for dinner. Be sure to be a good hostess.

Flip the ribs back over, meat side up, and slather them with your favorite BBQ sauce. Add as much as you want. Put the lid back on and grill for 3 minutes.

Remove the ribs from the heat, and let stand on a platter, uncovered for about 5 minutes. You want to give the meat a chance to reabsorb the juices before cutting them up.

Slice the ribs apart and chow down. Feel free to have more sauce available for dipping. Just have a bunch of napkins ready.

Wednesday, March 17, 2010

Oven Roasted Chicken with Thyme


See that picture up there? Notice anything about the wings? Yep, I did it again; I cooked my chicken upside down. Honestly, I still wasn't sure which side was the breast, but remembering how moist my upside-down Thanksgiving turkey turned out, I really didn't care. Once, the turkey came out of the oven and it was time to carve it up, I realized that it's actually not that hard to figure out which side is the breast...it's meatier.

Back to this recipe though, it was really moist and flavorful. It wasn't as lemony as I'd hoped, but I think I am the only one who expected a lot of tang here. I served the chicken with oven-roasted broccoli for the husband and a spring salad with homemade croutons for me.

Oven Roasted Chicken with Thyme
Served with Wilted Spring Greens and Homemade Croutons

Source: adapted from Martha Stewart
Everyday Food (March edition)
Printable Recipe


Ingredients for the Chicken
1 whole chicken, 3 1/2 to 4 pounds
1 lemon, halved
2 tablespoons extra virgin olive oil
1 1/2 tablespoons chopped fresh thyme + 3 whole sprigs
1 teaspoon dried thyme
salt
pepper (I used a combination of regular black pepper and freshly ground citrus pepper)

Salad Ingredients
8 ounces crusty bread (I used a leftover hoagie roll)
12 ounces spring mix salad
2 teaspoons red wine vinegar (I used peach champagne vinegar)
pan juices from the chicken
garlic salt
pepper
1 tablespoon extra virgin olive oil

Directions for the chicken
Pre-heat the oven to 450 degrees.

Remove any gizzards from your chicken. Rinse the chicken and pat dry. Set the chicken on a rimmed baking sheet, or in a roasting pan, breast side up.

Squeeze the juice of half a lemon inside the chicken cavity; place the rinds inside, along with the springs fresh thyme.

Squeeze the juice of the other lemon half all over the chicken. Rub the chicken with 2 tablespoons olive oil. Sprinkle with the fresh and dried thyme (I like using both, but you can just use one or the other if you prefer), salt and pepper.

Roast in the oven until a meat thermometer inserted in the thickest part of the thigh reads 165 degrees (about 45 to 50 minutes). Remove the chicken from the oven and transfer to a rimmed platter to rest. Do not cut into the meat right away as it will cause all of the juices to run out, leaving your meat dry.

Directions for the salad


Tear the bread into chunks.

Once you've transferred the chicken to a platter, toss the bread in the pan juices in the roasting pan. Season with garlic salt and pepper.

Bake until the croutons are golden and crispy, about 7 minutes.

Pour any accumulated chicken juice from the resting platter into a bowl. Add the croutons, spring mix, 1 tablespoon olive oil, and vinegar. Toss and serve with the chicken.

Tuesday, March 16, 2010

Thyme for Beer Potatoes


Ok, I'll admit, that was a cheesy title, but I couldn't think of anything better. Don't worry though, these potatos taste amazing and make up for the lame name. And the best part? They're super easy and they're cooked in beer.

What more could you ask for?

Thyme for Beer Potatoes
Source: Adapted from Martha Stewart
Printable Recipe


Ingredients

12 ounces beer
1 pound red potatos, scrubbed clean and quartered
1-2 teaspoons fresh thyme
1 teaspoon dried rosemary, crushed
sprinkle salt
heavy shake of pepper
water

Directions:
Bring just enough water to cover the potatos to a boil. Once the water is boiling, add in the potatos and the bottle of beer. Boil until tender.

Drain the potatos and toss with salt, pepper, rosemary, and thyme.

Monday, March 15, 2010

Aztec Brownies


The husband had a not so great week at work recently, so I decided to make him a sweet treat, but I didn't want to bake just any ordinary dessert.

Enter these Aztec brownies. Using a standard one-bowl brownie recipe from Bakers Chocolate, I enhanced the flavor with cayenne powder and cinnamon. Those simple additions took these brownies from ho-hum to a treat with a kick! The spiciness of the cayenne sneaks up on your palate, almost as an afterthought, and then lingers, beckoning you to take another bite, finally building to a hot punch. Even though the husband does not share my love of all things spicy, he agreed that the cayenne was a nice addition here.

These brownies are great with a simple sprinkle of powdered sugar on top, but I'm sure a dollop of whipped cream would be a sweet way to cool the heat.

Aztec Brownies
Source: Adapted from
Bakers Chocolate
Printable Recipe

Ingredients
4 squares unsweetened chocolate
3/4 cup butter
2 cups sugar
1 teaspoon cayenne
1 teaspoon cinnamon
4 eggs
1 teaspoon vanilla
1 cup flour
1/2 cup semi-sweet chocolate chips

Directions
Pre-heat the oven to 350 degrees.

Line a 13x9" pan with foil, greasing the foil.

Combine the butter and unsweetened chocolate in a microwave-safe bowl and microwave on high for 2 minutes. Stir the mixture to combine, ensuring that the chocolate is completely melted. (I had to nuke mine for another 45 seconds to finish melting the chocolate.)

Stir in the sugar, cayenne, and cinnamon until combined. Add in the vanilla and eggs, mixing in the eggs one at a time. Stir in the flour and chocolate chips, mixing well.

Pour the batter into the foil lined pan and bake for 30-35 minutes, or until a toothpick inserted in the center comes out with fudgy crumbs. Be sure not to over bake.

Wednesday, March 3, 2010

Grilled Veggie Sandwiches with Pesto


The fast food detox continues with this meal. My second day back in the kitchen after a week-long hiatus I decided to slice up a bunch of veggies and throw them on the grill. Knowing I would need to dress it up in order to entice the husband, I bought some hoagie rolls, spread them with a healthy layer of pesto and a sprinkling of freshly grated parm (not that powdered stuff in a can we all sprinkled on our spaghetti in the 80s!), and then stuffed the veggies in.

The husband's reaction? "Wow, these are really good! You can definitely add them to the rotation, maybe once a month." This coming from a guy who thinks eating nothing but Twinkies and Funions is vegetarian.

If you don't have a bbq, you can cook up the veggies on the stovetop in a grill pan, but they won't have the same smokey-sweet flavor. And please tell me you have a charcoal grill and not a propane bbq; let's not even go down that road again.

Feel free to change up the veggies to suit your preference.

Grilled Veggie Sandwiches
Source: A Cooking in Cucamonga Original
Printable Recipe

Ingredients
2 zucchini, sliced lengthwise
2 yellow crook-neck squash, sliced lengthwise
2 red bell pepper, seeds removed and sliced into quarters
1 green bell pepper, seeds removed and sliced into quarters
2 portabello mushrooms, rinsed of all dirt and stems removed (leave the gills intact)
pesto
freshly grated Parmesan cheese
salt
pepper
olive oil

Directions
Prepare a charcoal grill.

Place all of the prepared veggies in a large bowl and toss with a little bit of olive oil.

Once the coals are hot (all white), lay the vegetables on the grill in a single layer. You might need to cook in two batches, depending on the size of your grill.

Grill for about 3 minutes and then flip the zucchini and yellow squash over. Cook for another 2-3 minutes. The squash and zucchini should be slightly charred, and the vegetables should be much softer than when raw.

Once the skin of the bell peppers is charred, remove them from the grill.

Don't flip the portabello mushrooms; they are done when they are softer and slightly shriveled on the edges. Liquid may pool in the center of the mushroom during cooking.

Slice the mushrooms into 1/2" thick slices. Peel the charred skin off the bell peppers and discard.

Cut two hoagie rolls in half, lengthwise, and toast under the broiler. Spread with your desired amount of pesto (I used about a tablespoon or so per sandwich) and sprinkle with freshly grated Parmesan cheese. Top the pesto and cheese with the grilled veggies, sprinkle lightly with salt and pepper.

Enjoy!

Tuesday, March 2, 2010

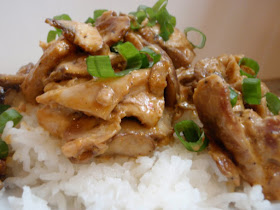
Thai Red Curry Chicken


After a week of no cooking and dinners of pizza, sushi, In-N-Out, and other junk, I finally returned to the kitchen and cooked the husband and I a real dinner. After looking at some of my favorite blogs, and a link to recipes using coconut milk, I eventually decided to make a simplified version of Thai chicken, using red curry paste. Unfortunately, when I went to my local grocery store they didn't have any curry paste, but they did have a bottle of pre-made red curry sauce; I quickly tossed it into the cart along with some jasmine rice and headed home.

I sauteed my chicken thighs in coconut milk to help layer the flavors since I used a pre-made sauce. The chicken browned up a bit as the milk thickened and evaporated a little, which I enjoyed. I added a few diced green onions on top for a little color and extra flavor to the meal, but you can leave them out if you like.

I was worried about the husband's reaction to this dish; he doesn't love Thai food the way I do and has had some dishes in the past that remind him of the Pakistani food he ate growing up-in a bad way. But I was pleasantly surprised when he said I should definitely make this again and that it tasted like "real" Thai food.


Thai Red Curry Chicken
Source: Inspired by The Rookie Chef
Printable Recipe

Ingredients

4 small boneless chicken thighs
4-6 cremini mushrooms, thinly sliced
1 can coconut milk
Thai red curry sauce (or red curry paste mixed into coconut milk) to taste
1 tablespoon oil
salt and pepper
cooked jasmine rice
2 green onions, diced (green tops only)

Directions

Bring the coconut milk to a simmer in a saucepan and add the chicken thighs. Sautee until chicken is cooked through. Let sit for 5 minutes to reabsorb the juices. Cut the chicken into bite sized chunks and set aside.

Heat a the oil in a large saucepan. Once it is hot, add the sliced mushrooms and sautee until tender. Add the chicken chunks and curry sauce (I used about 2-3 tablespoons), stir to combine. Cook until the sauce is heated through.

Serve the chicken and mushrooms over jasmine rice and top with diced green onions.

Monday, March 1, 2010

Dry Rib Rub


Dry Rib Rub
Source: adapted from my mom

Printable Recipe

Link
Ingredients
1 1/2 teaspoons packed brown sugar
1 1/2 teaspoons finely grated orange or lemon zest
1 1/2 teaspoons garlic salt
1/2 teaspoon ground cumin
1 teaspoon ground black pepper
1/4 teaspoon cayenne pepper

Directions
Combine all ingredients together in a small bowl.

Rub on defrosted baby back ribs and let marinate for 2 hours in the refrigerator, or overnight.