Wednesday, June 29, 2011

Grilled Summer Vegetables


The husband and I can be a bit of picky eaters when it comes to veggies, which leads to us eating far fewer vegetables than we should. But one of our favorite ways to incorporate more vegetables into our diets is by grilling them. The grill brings out the sweetness in the veg, similar to oven-roasting, while the burning charcoal imparts a nice smokey flavor into the food.

Usually, I just slice up the vegetables and sprinkle them with some salt and pepper, and maybe a drizzle of olive oil, before grilling em up. This time, I decided to make up something of a simple marinade to add some pizzaz. The lemon and lime juice adds a bright note to the veggies, without overpowering them.

The best part of this dish is that it works with whatever veggies you have on hand. The husband loves broccoli, so I threw some florets in for him, but you can easily leave them out. Onion slices would be delish, as would carrots or asparagus. Make it your own, but make it soon!

Grilled Summer Veggies
Source: A Cooking in Cucamonga Original
Printable Recipe

Ingredients

about 1 pound of summer squash (I used 1 yellow crookneck, 1 patti pan, and 1 round squash I don't know the name of)
1 medium head broccoli, stems trimmed and discarded
2 Tablespoons extra virgin olive oil
juice of 1/2 a lemon
juice of 1/2 a lime
1 teaspoon Italian seasoning
heavy shake salt and pepper

Directions
Prepare a charcoal grill for direct heat.
Slice the squash into planks or into bite-sized chunks.

Combine the squash and broccoli florets in a large bowl or Ziplock bag. Pour the remaining ingredients over the vegetables and stir or shake to combine.

Once the charcoal is medium hot (I usually cook my meat first, then the veggies, so the charcoal is at the appropriate temp) and the coals are glowing, but there aren't any flames, place a grill pan over the center of the grill. Pour the veggies into the grill pan and cook until the veggies are soft and slightly charred, about 5 minutes. Shake the grill pan and stir the veggies as they cook to ensure all the vegetables cook evenly.

Remove from heat and serve.

Monday, June 27, 2011

7 Layer Bars


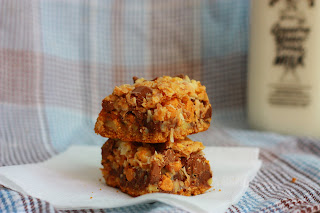
I recently brought dinner to a friend of mine who had a baby. The night before I planned to visit, I realized I didn't make any kind of dessert-you can't bring someone dinner and leave out the sweets! I didn't have a lot on hand (no milk really limits you in baking!), but I figured I could throw something together. A quick Google search lead me to these 7-Layer Bars, and luckily I had nearly all of the ingredients in my pantry; I did have to sub milk chocolate chips for the white chocolate, but really, who's going to complain about more chocolate?!

These bars are thick, a bit chewy, and wonderfully sweet. They're easy to whip up and a complete crowd pleaser. What more could you ask for in a dessert?

PS If you're looking for an easy, yet impressive dessert for the 4th of July, these cookies definitely fit the bill.

Seven-Layer Bars
Source: Brown-Eyed Baker
Printable Recipe

Ingredients

1 cup sweetened flaked coconut
8 tablespoons (1 stick) unsalted butter
9 graham crackers (5 ounces), crushed
1 cup finely chopped walnuts
1 cup semisweet chocolate chips
½ cup white chocolate chips (I used milk chocolate)
½ cup butterscotch chips
1 (14-ounce) can sweetened condensed milk

Directions

Adjust an oven rack to the lower-middle position and preheat to 350°F. Spray a 9×13-inch baking pan with non-stick spray. Line the pan with two overlapping pieces of foil or parchment paper, leaving overhang to act as handles for lifting the bars out of the pan. Spray with non-stick spray.

Spread the coconut on a baking sheet and bake until the outer flakes just begin to brown, about 4 minutes. (Keep a close eye on it – coconut can go from slightly browned to burnt in a matter of seconds.) Set aside.

Melt the butter and combine with graham cracker crumbs in a small bowl. Toss together until the butter is evenly distributed. Press the crumbs evenly onto the bottom of the prepared pan.

In order, sprinkle the walnuts, chocolate chips, white chocolate chips, butterscotch chips, and coconut over the graham crumbs. Pour the condensed milk evenly over the entire dish.

Bake until the top is golden brown, about 25 minutes. Cool in the pan on a wire rack to room temperature, about 2 hours.

Remove the bars from the pan using the foil or parchment handles and transfer to a cutting board. Using a sharp knife or bench cutter, cut into 2" by 3" bars.

Monday, June 20, 2011

Strawberry Nectarine Vodka Collins Popsicles


Wow, that's a mouthful of a title, isn't it? What about strawberry nectarine boozesicles? Better? Summer vodkasicles? Ok, ok, I'm getting a bit ridiculous here, I know. Whatever you want to call them, go for it, but the important thing is that you make these. Soon.

These are extremely customizable too what you have on hand; the original recipe calls for peaches, but I had nectarines. I bet mangoes would be wonderful as well. I also used half white sugar, half brown sugar because I didn't have enough white. And now I'm thinking I want to try switching the vodka for Malibu rum next time for a tropical twist.

If you're making these for non-drinkers or kids, you could switch out the alcohol with juice. I bet Kern's Nectar peach would be fabulous.

I picked up my popsicle mold at Target for about $4, though I've heard they have them in their $1 spot right now (I checked 2 Targets and couldn't find any). If you don't want to buy a popsicle mold, you could also use Dixie cups or cordial glasses.

Note: The Husband and I agreed the vodka taste was a bit strong in these, but I am not sure if that's because I put 3 Tablespoons of strawberry puree in each, rather than the 3 teaspoons the recipe calls for, or that they really are just strong. My best guess is, with the right amount of strawberry puree, the vodka won't be an overpowering taste. I do want to try making these with gin soon!


Strawberry Nectarine Vodka Collins Popsicles
Source: Endless Simmer
Printable Recipe

Ingredients

10 strawberries, pureed
nectarine syrup (recipe at the end)
12 ounces tonic water
2 ounces plus 3 ounces vodka (divided usage)

Directions
Stir 2 ounces vodka into the strawberry puree.

Pour 3 teaspoons strawberry vodka mixture into the bottom of popsicle molds. Set aside.

Pour the tonic water into the nectarine syrup and stir to combine. Add the remaining 3 ounces vodka and stir.

Spoon the nectarine mixture into the popsicle molds over the strawberry puree. Stir to combine.

Place in the freezer for 8 hours.

Nectarine Syrup Ingredients
1 nectarine, peeled, pitted, and sliced
1 cup water
1 cup sugar (I used half white, half brown sugar)

Directions

Puree the nectarine slices in a blender or food processor.

Combine the nectarine puree, water, and sugar in a saucepan. Bring to a boil and cook for 5 minutes.

Friday, June 10, 2011

Pantry Organization

I am a hot mess when it comes to organization and tend to just throw things on the floor or counters, rather than putting them away. My desk at work it often piled with papers that are in the process of being graded, have already been graded and need to be passed back, or need to be graded. My student assistant cleans up my desk for me at least twice a month!

Even worse than my desk is my pantry. I buy a lot of items in bulk, and then just toss them in the cabinent, still in the plastic bag from the grocery store. Or I transfer it (flour, sugar, dried coconut, etc) to Ziplock bags, which I label, but then again, just throw them in the cupboard, with no real rhyme or reason.

Look at what I am talking about! A huge mess, right?!


Beyond the fact that my pantry looks extremely disheveled, the mess also leads me to forget what items I have in stock, so I tend to buy the same things over and over, despite having a plentiful stock on hand.

Last Sunday, while the husband napped on the couch, and after finishing my 3 store grocery shopping trip, I finally decided to tackle the mess. I headed out to Wal-Mart, bought tons of glass storage jars and a package of labels, then headed home to empty and organize.

This is that same cabinet from the last picture, but all cleaned up. Amazing, right?!


Here's the shelf above it, which was just as messy to begin with.


I have what seems like a million types of flours (AP white, AP whole wheat, whole wheat bread, whole wheat pastry), brown sugar, white sugar, cinnamon sticks, sesame seeds, slivered almonds, whole almonds, milk chocolate chips and semi-sweet chocolate chips (we kept pulling our bag after bag of these delicious morsels; I'd even bought more during my grocery trip that morning, thinking I was running low!), and a ton of other pantry staples. Now, rather than digging through bags and bags of bulk items, I can just grab the canister it resides in and go.

There are a few items that are still in ziplock bags; most of those items are things I don't purchase often, so I didn't feel the need to spend the money on jars for them, when a ziplock bag will work fine.

Next up cleaning and organizing my spices, liquids, and other cooking supplies (bread crumbs, panko, cornmeal, etc).

Wednesday, June 8, 2011

Cashew Chicken Lettuce Wraps


Can I tell you how much I love Pinterest? I spend waaaaay too much time on there each week, scrolling through everyone's pins, repinning them to my own boards, looking for images to pin from other websites. I have been known to even have dreams about pinning. It's an addiction I tell you. But one I'm not looking to break anytime soon.

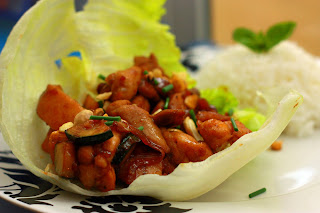
Most of my pins are food-related (of course!), which is how I came across this recipe for cashew chicken. A few days after I repinned it to my board, I cooked it up in my kitchen. Both the husband and I loved it, and wished I'd made more, practically licking our plates clean. The original recipe calls for butter leaf lettuce, but I couldn't find any, so I used iceberg since I already had some in the crisper. I think I added a bit too much cayenne though, as this dish was a tad spicy for the two of us, however, it didn't take away any of the yum. :)


Cashew Chicken Lettuce Wraps
Source: She Wears Many Hats
Printable Recipe


Ingredients for Chicken Cashew
2 chicken breasts (about 3/4 lb. total), diced
8 leaves of greenleaf or iceburg lettuce
3 tablespoons canola oil (or oil of choice)
1 cup onion, diced
2 garlic cloves, minced
1 teaspoon soy sauce
1/4 cup cashews, chopped
Salt and pepper to taste
basil, for garnish

Ingredients for stir fry sauce
2 tablespoons soy sauce
1 tablespoon rice vinegar
1 tablespoon brown sugar
1/4 teaspoon ground red pepper
1/4 teaspoon ground ginger
1 teaspoon sesame oil

Directions
For the stir fry sauce mix all ingredients together, making sure to dissolve the brown sugar. Set aside.

Heat canola oil in pan over medium to medium high heat. Add diced chicken and brown (about 4-5 minutes). Remove chicken from oil.

Add onions, garlic and 1 teaspoon soy sauce to pan; brown.

When onions and garlic are brown and tender, add the stir fry sauce, browned chicken and cashews. Saute mixture for a few minutes and remove from heat.

Spoon chicken mixture into individual lettuce leaves. Add your favorite hot sauce, more cashews or basil.

Monday, June 6, 2011

Janet Collins...My Spin on a Tom Collins


Have you ever watched Mad Men? The husband and I are big fans of the show, though we're a few seasons behind because we just started watching it on DVD a few months ago. I love the suave business environment with men in hats and liquid lunches. Well, let's be honest, it's not just liquid lunches, but drinks pretty much every moment of the day.

After watching 2 seasons of the show, and reading part of Boozehound, I decided it was time I venture beyond my standard vodka tonic and try something that would make Don Draper proud. As a classy bar in Vegas, all dark wood and bronze-vested barmen, I ordered a Mad Men classic, an oldfashioned. Wow. Just wow. It's basically just burbon, sugar, and muddled oranges and marishino cherries. Definitely a stiff drink. A little too stiff for me. I moved onto the Tom Collins, which I found to be much more up my alley. I was ready to join the Sterling and Cooper crew....I guess I'd have to be Peggy or Joan, since I'm not a guy.

I brought a bottle of gin down to my parents' house for a recent visit, promising to make a round of Tom Collins' for everyone, however, I failed to look up the recipe in advance, and wound up not having most of the needed ingredients. I summoned by inner Draper and improvised.

Janet Collins
Source: A Cooking in Cucamonga Original
Printable Recipe

Ingredients

2 shots gin (use the god stuff)
2 shots tonic water
3 shots 7-Up or Sprite
1 1/2 shots Rose's lime juice
juice of 1/4 lime
crushed ice

Directions
Pour all ingredients, except the ice, in a tall glass and stir to combine. Add additional 7-Up to taste, if desired.

Add crushed ice to two rocks glasses, and pour the liquid over the top. Garnish with a lime wedge and enjoy.

Sunday, June 5, 2011

Photo Class: 2 Peas Week 1

Despite having my DSLR for over a year now, I don't feel like my photography skills have progressed much in that time span. I began shooting completely in manual right away, but I usually have no idea what settings to use or why. I've joined some photo forums, but I spend more time on the social aspect than the learning portion, so I needed to try something else.

My blogging buddy, MJ of The Rookie Chef, recently bought a DSLR herself and we decided to tackle the 2 Peas photography course together, in hopes of actually learning how to take decent pictures. Once a week, we'll be posting our course work on our blogs, food pictures or not, to track our progress...and frankly, because I need some accountability! :)

This week's focus was aperature. I shoot wide open a lot of the time, so this week's lesson was great for me...I think I like shooting a bit more closed up! The tutorial instructed to shot in AV (aperture priority) mode this week, ignoring shutter speed; I also set my ISO and white balance to auto, so I could just focus on aperture.

I'd definitely love to hear any constructive criticism from anyone out there. :)

F/1.8


F/8


F/22

Wednesday, June 1, 2011

Grilled Artichokes


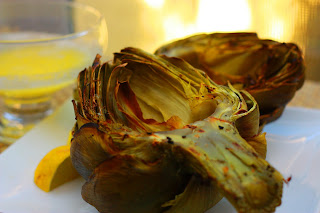
I have kind of a long commute home from work every day, and I often spend the time stuck in the car thinking about what I want to eat and what I am going to make for dinner, which is exactly how I came up with this recipe. I knew I was going to grill up some rib eye steaks that we didn't get around to cooking on Memorial Day, and as I was thinking about sides, I remembered I bought two ginormous artichokes recently, but hadn't eaten them yet. Since I already planned to have the grill fired up, I thought grilling the artichokes sounded good too. A quick Google search (not while I was driving!) turned up an abundance of blog posts and recipes, so after a quick glance through several different sites, I decided to just keep things simple and boil, then grill the chokes.

You want to boil them first to soften up the tough leaves; the grilling imparts a smokey flavor into the vegetable, which was perfect with a simple lemon butter. Since the whole point of grilling the artichokes is to get that smokey flavor, I once again highly recommend a charcoal grill over gas. You won't get the same flavor from gas.

Grilled Artichokes
Source: various websites

Ingredients

1 artichoke
1-2 Tablespoons butter
lemon juice to taste

Directions
Bring a pot of water, deep enough to cover your artichoke, to a boil. Boil the artichoke for 15-20 minutes, until tender. Meanwhile, stack your charcoal in a pyramid, creating areas of indirect heat, and light the fire.

Cut the artichoke in half, lengthwise. Pull out the purply inner leaves and the furry portion, leaving the heart intact.

Once your coals are white and hot, place the artichokes cut side down over indirect heat. Cover the grill and cook for 5-10 minutes, or until the artichokes are slightly charred.

Melt the butter and squeeze in your desired amount of lemon juice. I like to also squeeze straight lemon juice onto the artichoke itself. Dip the leaves in the lemon butter and enjoy.

LinkWithin

Blog Widget by LinkWithin