Showing posts with label fish. Show all posts

Thursday, July 5, 2012

Lobster Roll

lobster roll

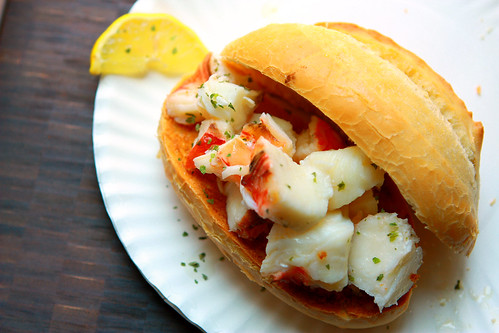
The husband and I recently tried the lobster roll with butter from the Lobsta Truck at a local food truck fest. We're both big fans of lobster-well, of shellfish in general, really-and I'm a fan of food trucks, so we were pretty excited to eat at the Lobsta Truck. Since there were so many different  food trucks there that I wanted to try, and the fact that a lobster roll was $12, we decided to split one.

The lobsta roll was definitely great, made even better that they dressed the hunks of lobster in butter rather than mayo (I am decidedly not a fan of mayo). As we walked away, finishing the last few bites, the husband and I started talking, as we so often do, about trying to recreate it at home.

It seems Costco has their seafood road show every other weekend, with amazing prices on scallops, crab, and of course lobster, so it was only a short amount of time until we found ourselves in possession of some huge lobster tails (these bad boys were about a pound each!) and able to attempt a recreation. I did a quick Google search and couldn't find any recipes for lobster rolls that did not use mayo, so I decided I'd just wing it and keep it simple.

I quickly steamed the tails, melted some butter with a squeeze of lemon juice, and put together two sandwiches. Gloriously delicious! They were better than what we sampled from the Lobsta Truck-so much so, that we had the same thing for lunch two days later.

Lobster Rolls with Butter
Source: Inspired by the Lobsta Truck, execution my own

Ingredients
3/4lb to 1 pound lobster tail meat
1/2 stick butter
lemon juice to taste (I used about a 1/2 teaspoon in the butter and then added more to my sandwich after assembly)
garlic salt to taste
about 1/4 to 1/2 teaspoon dried parsley
2 sandwich rolls

Directions
Using a sharp knife or kitchen shears, split the top of the shell down the middle, exposing the meat. Crack open the shell, leaving it attached on the backside. This will help the lobster meat steam and will make it easier to remove the shells once the tails are cooked.

In a large stock pot with a steamer basket, bring about 4 cups of water to a boil. Once the water is boiling, place the lobster tail(s) in the basket and cover.

Steam the lobster until the meat turns white all the way through, about 8 minutes per pound.

Meanwhile, melt the butter. Once the butter is melted, combine it with the lemon juice, garlic salt, and dried parsley in a medium bowl. Set aside.

Once the lobster is cooked through, remove from the steamer basket and let sit on a cutting board about 3-5 minutes, until cool enough to handle. While the lobster cools, split the rolls in half, and toast.

Completely remove the shells and discard. Cut the lobster meat into bite-sized chunks.

Add the lobster meat to the butter mixture and toss to combine. Spoon the lobster onto the sandwich rolls and drizzle with remaining butter mixture. Sprinkle additional lemon juice onto each sandwich, if desired.


Sunday, April 15, 2012

Sushi Bowls

sushi bowl

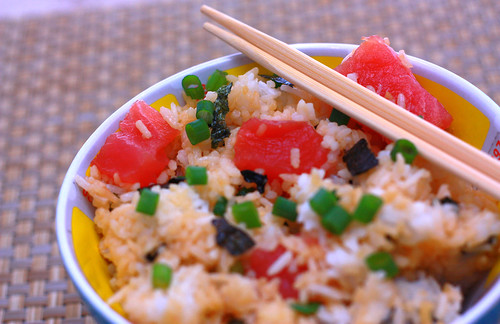
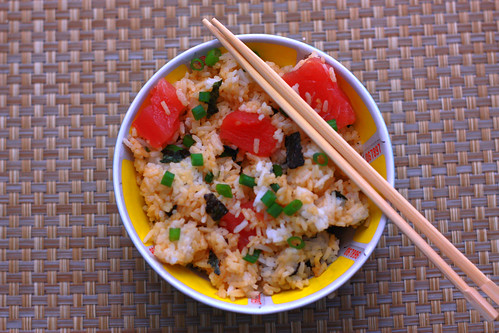
The husband and I love sushi, and we often go out for rolls on Friday night. I've even tried making sushi at home before, and while it taster good, the effort required to put it together wasn't worth it for me. But then I found these sushi bowls on The Crumbly Cookie; I liked the idea of all the sushi ingredients and flavors combined simply in a bowl, but without the hassle of making rolls. Because really, what I wind up making is a mess.

The husband loved these sushi bowls he asked me to make them at least once a week. He was impressed how easy it was to put them together and the lack of a mess in the kitchen (I cook, he cleans!). :)

Make sure to get good-quality, sushi-grade fish since you'll be eating it raw. We like to go to 99 Ranch Market and pick out what looks the best. I used tuna steak this time, but we're thinking of trying salmon belly next time.

Sushi Bowls
Source: The Crumbly Cookie

tuna sushi bowl

Ingredients

1 1/2 cups uncooked rice, rinsed well
3 cups water
4 teaspoons rice vinegar
4 teaspoons sugar
1/2 teaspoon salt
1/4 cup soy sauce
1-2 teaspoons wasabi
1/4 pound raw fish
green onions, chopped
nori, torn into small pieces
2 Tablespoons sesame seeds (optional: toast them)


Directions

Combine rice and water in a rice cooker and cook. Or cook in a covered pot on the stovetop. Once rice is cooked, remove from heat and let sit, covered, for 10 minutes.

Combine the rice vinegar, sugar, and salt in a small microwaveable bowl and heat for 30 seconds. Stir to dissolve the sugar.

Transfer the rice to a large wooden or glass bowl (I used a large melamine bowl and it worked fine) and pour the vinegar mixture over the top. Fold and cut through the rice with a paddle or spatula to coat each grain with the vinegar mixture. Continue folding, cutting and fanning until the rice is room temperature-do not put in the refrigerator.

Combine the soy sauce and wasabi and pour over the cooled rice. Add in the fish, green onions, nori, and sesame seeds. Gently fold together to combine with the rice.

Serve with additional soy sauce and wasabi on the side.

Tuesday, November 9, 2010

Red Snapper with Tomatillo Salsa


Following Phase One of South Beach has not been easy...I feel like the list of things NOT to eat is miles long, and the approved list of foods is teeny tiny. The results have definitely been worth it so far, but I do have to admit, I fell off the wagon a bit recently....I ate a McRib over the weekend and a Whopper on my way to class last night. oops. :/ So I guess Phase One will extend an extra week for me, to make up for those "cheats".

Back to this recipe. I needed something tasty and non-chicken based for a Phase One meal, so I turned to fish. The husband loves fish, and even though I love sushi, I am really picky about cooked fish. I don't like it to taste fishy and the texture needs to be firm and flakey, otherwise it just totally grosses me out. I'd had macadamia nut encrusted halibut at a restaurant back in September and thought it was a nice mild fish, so when I saw this original recipe (it calls for halibut) I figured we'd give it a try.

Unfortunately, fish has seasons (did you know this? I didn't) and apparently halibut is not in season in October/November. The fish monger at my local Henry's told me if I could find fresh halibut (I don't like buying bags of frozen fish either. yuck) it would be crazy expensive, and then steered me towards the red snapper fillets. I didn't feel like piling up the charcoal and manning the grill, so I cooked the fish under the broiler-yum!

I loved the tomatillo salsa too. This was my first time trying a tomatillo and I will definitely be making this chunky salsa again soon.

Red Snapper with Tomatillo Salsa

Source: Adapted from
Kalyn's Kitchen
Printable Recipe

Ingredients for the fish
4 red snapper filets (about 1 pound total)
1/2 teaspoon onion powder
1/2 teaspoon ground cumin
1 teaspoon chile powder
1/2 teaspoon Spike seasoning
1 teaspoon fresh ground black pepper
1/4 teaspoon salt
1 teaspoon fish rub

Directions for the fish
Turn the broiler on to high.

Combine all of the ingredients, except for the fish, in a small bowl and mix together.

Spray a piece of foil with non-stick spray and lay the fish on top. Rub the mixture over the tops of each piece of fish.

Broil for about 2-3 minutes per side, or until the fish is just cooked through and is flaky. Serve with the tomatillo salsa.

Salsa Ingredients
5 medium-large tomatillos, husks removed, chopped
one 3-ounce can diced green chiles (I used the fire roasted chiles)
2 cloves garlic, minced
1/3 cup red onion, minced
1/2 cup cilantro leaves, chopped
1/3 cup lime juice, or to taste
1/2 teaspoon dried, crushed jalapeno (optional)
salt and pepper to taste

Salsa Directions
Combine all ingredients in a medium bowl and toss. Refrigerate for 30-60 minutes to allow flavors to blend.

Toss again before serving.

Wednesday, July 7, 2010

Rosemary Dijon Salmon Burgers


I posted this recipe a few months ago, but without any commentary or pictures, and with the unappealing title "Salmon Patties." All of these things added up to a less than stellar, not to mention enticing, post.

The burgers were a huge hit with the husband, who asked that I make them every two weeks, so I felt like a new post was in order. I made the salmon burgers again, much to the excitement of the husband, and dressed them up with slices of avocado and garden fresh tomatoes. Even I, who doesn't care too much for fish (unless it's sushi!), loved these burgers. We use sandwich thins as our buns, which cuts down on the carbs and really lets the flavor of the burger stand out.

Rosemary Dijon Salmon Burgers
Source: Adapted from Serious Eats
Printable Recipe


Ingredients

4 salmon fillets, skin removed (about 1 1/2 pounds)
2 teaspoons Dijon mustard
1 teaspoon Deli Mustard (optional)
1 tablespoon black pepper
4 green onions, roughly chopped
2 teaspoons fresh rosemary, chopped
1/2 bread crumbs
pinch salt
juice of 1/2 a lemon

Topping Ideas
Dijon mustard
ketchup
mayo
tarter sauce
tomato slices
avocado slices
lettuce

Directions

Cut the salmon fillets into large chunks. Put about 1/3 of the salmon in a food processor, with the mustard and pepper. Process until the mixture becomes a thick paste, scraping down the sides as needed. Add the green onions towards the end and process so they are finely chopped into the fish.

Add in the rest of the salmon and the rosemary and process just until the larger chunks are combined with the salmon mixture. The fish should still be in chunks, about a 1/4", not completely pureed.

Scrape the fish into a bowl and add the bread crumbs and lemon juice. Mix together, then form into 4-6 patties of even thickness.

Grill for about 3-4 minutes per side, until the patties reach an internal temperature of about 150 degrees.

Dress with bun and topping and enjoy!

Thursday, June 17, 2010

White Wine Mussels


I've been craving mussels for over a year now. At the start of last summer, the husband and I road tripped it on up to San Francisco for a long weekend and while we were there we met up with some friends of mine for dinner at Q, where our group shared a bowl of mussels in broth. The dish was incredibly good and we greedily soaked up the broth with hunks of warm bread. That dinner stayed in my mind throughout the trip, and in the year since then I've had a longing to recreate the meal.

I spotted mussels at a decent price in the seafood section of Henry's recently, so I scoured the internet for the perfect recipe (well, not really. I just picked the first hit on Google) and got to work. While mussels do take a bit of prep work, since you have to soak them, this is not a difficult or extremely laborious dish. My best advice would be to chop the garlic, shallots, and parsley while the mussels are soaking, rather than lounging on the couch watching Real Housewives of NYC.

Debearding the mussels is a bit weird--it feels like they are fighting back as you yank their beards off (maybe they are?)--but it's better than eating that hairy stuff attached to them. Make sure you scrape off any barnacles or other ocean debris on the outside of the shells as well.

Use a good white wine, as it is the base of the broth, and serve each bowl of mussels with a big hunk of crusty bread. Bon appetite!

White Wine Mussels
Source: Adapted from Food Network, Barefoot in Paris (Ina Garten)
Printable Recipe


Ingredients

3 pounds fresh mussels
1/3 cup all purpose flour
2 Tablespoons unsalted butter
2 Tablespoons olive oil
1 cup chopped shallots (5-7 shallots)
1 1/2 Tablespoons minced garlic (5-6 garlic cloves)
1 pint grape tomatoes, whole
1/3 cup chopped parsley
1 Tablespoon fresh thyme leaves
1 cup white wine
2 teaspoons kosher salt
2 teaspoons pepper

Directions
Fill a large bowl with 2 quarts of water and add the flour. Pour in the mussels and let soak for 30 minutes to dredge any sand. (My mussels opened a bit, gently sighed, then closed and sank. It was cute.)

Drain the water and rinse off the mussels. Throw away any with open shells. Using your fingers, grasp the beards and pull off. (I found the best way to do this was yank the beard quickly towards the top of the shell.) Scrub the shells with a brush to remove any lingering debris.

In a large non-aluminum stockpot, heat the butter and oil over medium heat. Once the butter is melted add the shallots and cook for 5 minutes. Then add the garlic and cook for an additional 3 minutes, or until the shallots are translucent.

Add the tomatoes, thyme (I throw the whole branch in), parsley, wine, salt and pepper. Bring to a boil. As the tomatoes soften, gently smash them with the back of a wooden spoon to incorporate their juice into the broth.

Add the mussels, stir them once or twice, then cover and cook over medium heat for 8 to 10 minutes, or until the mussels are opened (throw away any that don't open). Shake the pot once or twice to ensure the bottom mussels don't burn.

Serve the mussels in a bowl with the broth and a hunk of bread.

Monday, May 17, 2010

Marinated Grilled Salmon


It often feels like the husband and I eat nothing but chicken and ground turkey. Mainly because when we eat at home, we eat pretty much nothing but chicken and turkey. :) We made a conscious decision some months ago not to buy red meat anymore (though we do every once and awhile, like the birthday filet mignon) for a variety of reasons, and we don't really eat fish (other than sushi), since I am not a fan. The husband doesn't eat pork (other than some occasional bacon and baby back ribs) and while we like lamb, I never think to pick any up at the store.

So once you look at those self-imposed restrictions, we really are left with poultry as our only non-veggie option. But the husband recently mentioned that he misses eating fish, so since I like to keep him happy, I picked up two wild Alaskan salmon fillets on my next trip to the grocery store. I googled "grilled salmon" and found an appealing marinade on Allrecipes.com.

Well, I am glad I agreed to adding some fish into our meal plan again! This salmon turned out perfectly! The brown sugar gives a hint of sweetness to the fish and the grill infuses a smokey flavor throughout the flaky flesh. This was nothing like the mushy, fishy-tasting salmon I remembered from the last time I cooked up some fish. It definitely helped that I bought high quality fish, rather than the big bag of frozen fillets at Costco. I told the husband I would definitely eat this dish again, so it looks like fish will be making a more regular appearance on our weekly menus in the near future.


Marinated Grilled Salmon
Source: adapted from Allrecipes
Printable Recipe

Ingredients
2 Wild Alaskan salmon fillets, about 1.5 pounds
1/4 cup low sodium soy sauce
1/4 cup brown sugar
1/4 cup water
1 Tablespoon extra virgin olive oil
1 teaspoon ground ginger
freshly ground black pepper
sprinkle salt

Directions
Sprinkle each fillet with salt and pepper.

Combine the remaining ingredients in a small bowl and stir until the sugar is fully incorporated.

Place the salmon fillets in a large ziplock bag and pour in the marinade. Turn to fully coat. Refrigerate and let marinade for 2 hours.

Soak a handful of wood chips in cold water while the fish marinates.

Heat a charcoal grill. Once the coals are white hot, sprinkle the wet wood on top of the coals. Grill the fish, with the lid on to trap the smoke from the wood chips, for about 4-6 minutes per side, depending on thickness.

Tuesday, March 23, 2010

Tomato Shrimp Pasta


This was supposed to be a pesto shrimp pasta recipe, riffing off of this recipe, but as the pasta was cooking, I realized I was out of pesto. :( I didn't want to make a run to the grocery store to buy more, so I decided to improvise and whip up a quick tomato sauce instead.
I was really happy with the way it turned out and would definitely make it again. While the pasta is cooking, butter some rolls, sprinkle with garlic salt, and place under the broiler for quick garlic bread.

Tomato Shrimp Pasta Source: a Cooking in Cucamonga original Printable Recipe Ingredients
3 cups twirly pasta
2 cups peeled, uncooked shrimp
1 can stewed Italian tomatoes
1 can tomato paste
salt
pepper
1 tablespoon dried basil
1/2 -1 teaspoon crushed red pepper
3 cloves of garlic, crushed.
1 tablespoon olive oil
grated Parmesan cheese

Directions
Bring a large pot of water to a boil. Cook the pasta to al dente (mine took about 8 minutes).

Remove the pasta, but reserve the water. Boil the shrimp in the pasta water, for about 2 minutes, or just until the shrimp is completely pink. Remove the shrimp, reserving about 2 cups of the cooking water.

Heat the olive oil in a large sauce pan. Once the oil is hot, add the crushed garlic and saute for about a minute. Add the tomato paste, stewed tomatoes, salt, pepper, dried basil, and crushed red pepper. Bring to a simmer and add 1/2 cup of the pasta water at a time, until the sauce has reached your desired consistency.

In a large serving bowl, combine the pasta and shrimp and toss with the tomato sauce. Garnish with Parmesan cheese.

Monday, January 25, 2010

Salmon Cooked in Parchment


The husband and I both had Martin Luther King Jr. Day off recently, and since it was pouring down rain, couping us up at home, I had him help me meal plan. As we went through the freezer to assess what food we actually had on hand, we found a nearly full bag of individually wrapped salmon fillets from Costco. He immediately requested salmon for dinner one night and I hesitantly agreed.

I don't like salmon. I think it is too fishy and gross. I have a hard time cooking it; I never get reliable results and the last time I grilled it, my piece was mushy and incredibly fishy even when covered in salsa. The husband thinks I am crazy and loves salmon, and will eat my piece when I balk at it. So as the pre-planned salmon day rolled around, I talked the husband out of it. Being the kind person that he is, he agreed on an alternative meal.

However, some of my work cronies said I was being mean and should just cook the man some fish and make myself whatever I wanted. Fine. I'll make the fish.

Not wanting to grill in the freezing cold-ok, maybe I am being dramatic, but this is southern California, so it was cold in my opinion-I turned to my trusty copy of Martha Stewart's Every Day Food (The Light Issue) and found a recipe for salmon cooked in parchment. She called for capers and green beans, neither of which I had on hand, oil, which I forgot to use, and I added lemon, so obviously I have heavily adapted this recipe. However, the husband gobbled it up and declared it to be delicious with just the right amount of lemon.

I'll have to take his word for it; I ate pasta with arugula instead.

Salmon Cooked in Parchment Source: Adapted from Martha Stewart's Every Day Food Printable Recipe Ingredients
1 salmon fillet
Juice of 1/2 a lemon
zest of 1/2 a lemon
garlic salt
pepper

Directions
Pre-heat the oven to 450 degrees.

Place the salmon fillet in the center of a large piece of parchment paper. Squeeze the lemon juice over the fish, top with the zest, and sprinkle with garlic salt and pepper.

Bring the long edges of the parchment up to meet in the middle, and then fold over three times, making a seam. Fold over the edges as well, forming an envelop around the fish.

Place the parchment-wrapped salmon on a cookie sheet and bake for 8-10 minutes. The parchment will brown, and may puff up slightly.

Saturday, December 26, 2009

Chili Lime Salmon


This is a quick, easy, and healthy dinner that can easily be made on a hectic weeknight. The chili powder adds a hint of heat without being overwhelming, while the lime juice adds a nice citrusy twist. I normally douse my salmon in salsa to cover up the taste of the fish, but this time I left the salsa in the fridge and enjoyed the slight heat of the seasonings. I served the salmon with some cous cous cooked in turkey stock.

Chili Lime Salmon

Printable Recipe
Source: Me

Ingredients
1 salmon fillet
pepper
chili powder
1 lime

Directions
Place the salmon skin-side down on a plate and pat the salmon dry.

Generously coat with pepper and chili pepper. Gently rub the seasoning into the flesh. Squeeze the juice of half a lime over the fish.

Grill skin-side down for 4 minutes, with the BBQ lid on. Flip the fish over and grill for an additional 3-4 minutes.

Squeeze the juice of the remaining lime half over the flesh side of the fish and serve immediately.

Saturday, July 18, 2009

Sushi: Spicy Tuna Rolls


Friday night in my household means one thing: Sushi at our local sushi joint. Well, quasi-local....it's kind of a chain. But they have great rolls at the best prices. We love to pull up a seat at the sushi bar and watch the chefs work their magic, while hopefully catching a game on their TVs. However, the service there is less than stellar; wait forever to get a drink refill, wait an eternity for the server to pick up the tab from the sushi chef, another lifetime for them to bring us the check, what feels like hours for them to come get the check from us, and then just when you are in the home strech and only need to sign the bill...WHERE is the waiter?

Why can't we just get some good sushi without the hours wait just to pay them for the food? We have semi-resolved this by sitting at the regular bar or just ordering food to go. This Friday night I opted to go an entirely different route: I attempted homemade sushi.

I also learned that there are A LOT of different kinds of rice out there and jasmine rice is not the same as sushi rice. And there is not a single bag of rice labeled "sushi rice" at any market around me, including the Asian grocery store. (For the record any short grain rice, such as sweet rice, will do.)

Spicy Tuna Rolls
*Note: You will need a bamboo mat for this. I picked one up at my local Asian market for about a $1.25.

Ingredients for the rolls
3/4 lb. ahi tuna
1/2 cucumber, thinly sliced
1/2 avocado, thinly sliced
2 sheets nori (dried seaweed)
1 tablespoon chili past
3 tablespoons mayo

Ingredients for the rice (courtesy of Alton Brown)
3 cups sushi rice, uncooked
3 cups water
3 tablespoons rice vinegar
3 tablespoons sugar
1 1/2 tablespoons salt

To make the rice:
(Alton Brown has a great video demonstrating how to make sushi rice.)
First, rinse the rice in cool water several times, until the water is clear.

Combine rice and water in a large pot and bring to a boil, uncovered. Once the water is boiling, turn the heat to low and cover. Let cook, with the lid on, for 15 minutes. After 15 minutes, leave the lid on and turn the heat off. Lets sit undisturbed for 10 minutes.

In a small bowl, combine rice vinegar, sugar and salt. Microwave for 30 seconds to help the vinegar absorb some of the sugar and salt. (Note: It will not absorb all of the sugar and salt.)


Transfer rice from cooking pot to a large wooden or glass bowl (I used plastic as I don't have either a glass or wooden bowl. Don't use a metal bowl!). Pour the vinegar, salt and sugar over the top of the rice and cut and fold the rice with a serving spoon. You want to coat all grains of rice with the vinegar mixture, while also cooling the rice down.

Continue stirring the rice or use a paper plate to fan it, bringing the rice to room temperature.

For the rolls:
In a small bowl, mix together the mayo and chili paste. (Omit if you just want regular tuna, instead of spicy tuna rolls.) Set aside.


Unroll the bamboo mat so it is flat. Spread rice on the mat and cover with 1/2 a sheet of nori. You can also lay the nori down first and spread the rice on top. Either way is fine: do you like your rolls with rice out, or seaweed out?


See the rice under the nori?

Once you've spread the rice out and covered with nori, lay a piece of tuna down the middle. Add pieces in one layer until they make a line from top to bottom on the nori. Spread a layer of chili paste/mayo on top of the fish. Top with slices of avocado and cucumber.


Using the bamboo mat, gently roll the sushi together. (I found I needed to add some rice along the seam to make sure the roll did not unfold.) Gently squeeze the sushi through the mat once it is rolled up.


To cut, dip your finger tips and the knife blade in water. This helps prevent the rice from sticking.

Serve with wasabi, soy sauce and lightly salted edamame (soy beans).

Monday, May 11, 2009

Diablo Shrimp

My grocery store had a 2 pound bag of raw, deveined, easy peel shrimp on sale for $7.98. That is $10 off their regular price, so I quickly snatched up a bag and threw it in my cart. I had no idea how I was going to cook the shrimp, other than I knew I wanted to grill them on my Webber, along with some corn on the cob.

I love spicy food combined with the tartness of lime, so I mixed up this marinade and I must say, the shrimp came out so tasty! They had a nice kick, but weren't too spicy, so my husband was able to enjoy them as well. (His spicy tolerance is much lower than mine.)

Unfortunately, we ate this so fast that I forgot to photograph. :( But I am planning to buy several more bags of shrimp this week while they are still on sale, so expect photos soon. :)

Diablo Shrimp
2 pounds shrimp, peeled and deveined
1-2 tablespoons chili powder
1 teaspoon cayanne pepper
3 cloves garlic, minced
3 tablespoons olive oil
1-2 teaspoons salt
3 teaspoons pepper
2 limes, juiced
1 tablespoon chives, chopped

Combine all ingredients, except for the shrimp, in a large bowl. Mix well.

Add shrimp to the marinade and stir to coat. Marinate for 30 minutes.

Grill shrimp in a grill pan or basket on your charcoal grill. If you are like me, and do not have a grill pan, use a large sheet of foil and make a rectangular basket for the shrimp. Place that on the grill and cut slits into it with a knife to allow the smoke through.

Grill for about 5 minutes, stirring the shrimp around, until they are completely pink.

I also grilled 2 ears of corn on the cob, still in their husks, at the same time. For dessert: watermelon. :)

Monday, April 20, 2009

One year later

Yesterday was my husband and I's first wedding anniversary. I can't believe how fast the year has gone... it feels like our wedding was yesterday. I kept thinking about little details throughout the day, remembering peeking around my hotel room door and seeing my soon-to-be husband walking down the hallway (and me quickly jumping back into the room!), getting ready with all of my best friends who had flown from hundreds of miles to be there with me, taking tons of photos throughout the day, and just being so excited after the ceremony was over and we were Married!!

Now a year later, not only are we married, but we've bought a home together and are building tons of new memories everyday. It's been a great year of married life and I can't wait to celebrate many more with my husband!

We decided to celebrate our anniversary in a low-key, but fun fashion. We packed up our cooler with hot dogs and sodas and set out to a local state park, where we grilled our lunch in the shade of the trees. The weather was hot and tons of families were out with same idea: enjoy the weather in the great outdoors with the people you love. After a lunch of 3 hots dogs each and a bag of chips, we spent some time reading in the shade, before walking over to the large lake and renting a paddle boat. That was a lot of fun, but more work than I anticipated! We paddled around for an hour, enjoyed the breeze coming off the water, and then decided to head home.

Here' s where the cooking part of my blog comes in. :) We purchased 4 lobster tails at Costco the day before for about $50 and grilled them up for a special anniversary dinner. SOOOOOOO good!! I didn't take any photos (sorry!) as they smelled SO good I didn't want to take the time to plate them and make sure they looked nice. We just wanted to dig in!

Next time you find lobster tails on sale, I highly recommend you try out this recipe. It is so flavorful, fragrant, and easy. In fact, I will be making these again in just a few weeks for my husband's birthday (and I will add photos! Check back in mid-May).


Grilled Lobster Tails
  • 4 lobster tails (they were about 3 pounds total.)
  • White wine
  • Olive oil
  • Salt
  • Pepper
  • Green onions, sliced
  • Parsley, coarsly chopped
  • Garlic, sliced or chopped
  • Butter (not melted)

Heat your charcoal grill (if you have a gas grill, put it out for trash and go buy a charcoal grill. The flavor is SO much better! Or just turn the gas grill onto high.) You want your coals to be nice and hot for the lobster.

Place one lobster tail on aluminum foil and cut the top of its shell in half, right down the middle, using scissors. (Cutting through their shells is kind of difficult, but stick with it! I found it was easiest to slide the bottom scissor blade under the shell, then push the top blade down with my palm, to crack through the shell.)

Using a knife, cut into the lobster meat, making a slit 3/4 of the way through the meat, all the way down the tail. Rub salt and pepper into the meat. Rub the garlic into the meat. I also tucked some sliced garlic into the space between the top of the shell and the meat. Sprinkle the green onions and parsley into the cut portion of the meat. Pour some olive oil down the length of the tail, into the meat. Push tabs of butter into the sliced section of the tail. Pour white wine across the entire tail (be generous here!).

Wrap the foil around the lobster, making sure the entire tail is covered. I double wrapped mine to prevent the liquids from spilling out.

Repeat with the remaining lobster tails.

Place the foil-wrapped tails on the grill over high heat and cook for about 8 minutes, depending on their size. I wound up cooking mine for about 10 minutes. Take one packet off the grill and carefully open the foil using tongs (don't let all the juice slop out!!). Check that the meat has turned an opaque white. If it is still translucent, cook for about 2 more minutes.

Once they are done, remove the packets from the grill using tongs or a pot holder and carefully unwrap. Plate each lobster tail and pour any juices in the foil packet over the top of the lobster. Serve with additional butter pats and crusty bread.

Enjoy!

LinkWithin

Blog Widget by LinkWithin