Thursday, July 5, 2012

Lobster Roll

lobster roll

The husband and I recently tried the lobster roll with butter from the Lobsta Truck at a local food truck fest. We're both big fans of lobster-well, of shellfish in general, really-and I'm a fan of food trucks, so we were pretty excited to eat at the Lobsta Truck. Since there were so many different  food trucks there that I wanted to try, and the fact that a lobster roll was $12, we decided to split one.

The lobsta roll was definitely great, made even better that they dressed the hunks of lobster in butter rather than mayo (I am decidedly not a fan of mayo). As we walked away, finishing the last few bites, the husband and I started talking, as we so often do, about trying to recreate it at home.

It seems Costco has their seafood road show every other weekend, with amazing prices on scallops, crab, and of course lobster, so it was only a short amount of time until we found ourselves in possession of some huge lobster tails (these bad boys were about a pound each!) and able to attempt a recreation. I did a quick Google search and couldn't find any recipes for lobster rolls that did not use mayo, so I decided I'd just wing it and keep it simple.

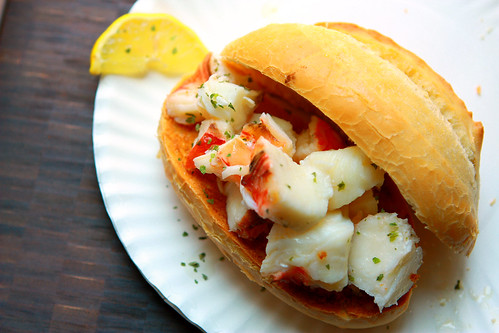
I quickly steamed the tails, melted some butter with a squeeze of lemon juice, and put together two sandwiches. Gloriously delicious! They were better than what we sampled from the Lobsta Truck-so much so, that we had the same thing for lunch two days later.

Lobster Rolls with Butter
Source: Inspired by the Lobsta Truck, execution my own

Ingredients
3/4lb to 1 pound lobster tail meat
1/2 stick butter
lemon juice to taste (I used about a 1/2 teaspoon in the butter and then added more to my sandwich after assembly)
garlic salt to taste
about 1/4 to 1/2 teaspoon dried parsley
2 sandwich rolls

Directions
Using a sharp knife or kitchen shears, split the top of the shell down the middle, exposing the meat. Crack open the shell, leaving it attached on the backside. This will help the lobster meat steam and will make it easier to remove the shells once the tails are cooked.

In a large stock pot with a steamer basket, bring about 4 cups of water to a boil. Once the water is boiling, place the lobster tail(s) in the basket and cover.

Steam the lobster until the meat turns white all the way through, about 8 minutes per pound.

Meanwhile, melt the butter. Once the butter is melted, combine it with the lemon juice, garlic salt, and dried parsley in a medium bowl. Set aside.

Once the lobster is cooked through, remove from the steamer basket and let sit on a cutting board about 3-5 minutes, until cool enough to handle. While the lobster cools, split the rolls in half, and toast.

Completely remove the shells and discard. Cut the lobster meat into bite-sized chunks.

Add the lobster meat to the butter mixture and toss to combine. Spoon the lobster onto the sandwich rolls and drizzle with remaining butter mixture. Sprinkle additional lemon juice onto each sandwich, if desired.


Tuesday, May 22, 2012

Singapore Sling

singapore sling

 I think I may have established that I love gin (Janet Collins, Ginger Mayhem. It is definitely my go to spirit, replacing vodka's long-held top spot as my boozy favorite. And my current favorite gin-based drink is this retro cocktail: the Singapore Sling. It's a fruity, sweet concoction that reminds me of Hawaii (even though I pretty much only drank Mai Tais and beer in Hawaii). If you're hesitant to give gin a try, this is the perfect cocktail.

Singapore Sling 
Source: Drinks Mixer 


Ingredients
1 ounce gin
1/2 ounce cherry brandy
4 ounces pineapple juice
1/2 ounce lime juice
1/4 ounce Cointreau orange liqueur
1/4 ounce benedictine herbal liqueur
1/3 ounce grenadine
1-2 dashes Angostura bitters
ice


Directions 
Fill a cocktail shaker with ice. Combine all the ingredients in the shaker and shake until the shaker is well frosted.

Fill a lowball glass halfway with ice and strain the liquid into the glass. Garnish with a pineapple slice and a cherry if desired.

 Makes one cocktail

Friday, April 27, 2012

Ginger Mayhem

I like booze. I like champagne, sweet wine, craft beer, and cocktails. I'm constantly seeking our new micro or craft brews to try,and buying champagne to fancy up ordinary dinners. I especially like making cocktails, and drawing inspiration from Mad Men, vintage cocktails. I've conquered the Singapore Sling, the Bahama Mama, and Rum Runners. If it involves gin, I like it.

The husband and I have built up quite the alcohol cabinet, from the basics (gin, vodka, tequila, rum), to the less likely (blue curacuo, cointreau, creme de cacao, benedictine), to a plethora of mixers (grenadine, Rose's sweetened lime juice, oj, pineapple juice, and club soda). Basically, we have pretty much whatever you need to make almost any cocktail.

So when we went out to a new restaurant/lounge and I tried their Ginger Mayhem, a strongly ginger-flavored gin cocktail, I knew I needed to try mixing it up at home. It's different than many other cocktails out there, but in a good way. The ginger is spicy and warm, but plays well with the botanical flavors of the gin, especially with good quality, small batch gin.

I've tried this with store-bought ginger beer and homemade ginger syrup. Each version is good, though the ginger syrup gives it a bolder, spicier, ginger flavor, whereas the ginger beer is a bit more mellow and cool. Either way, ditch happy hour and make these cocktails at home! :)

I like to play around with using lemon juice, bottled key lime juice, and fresh lime juice, with each variation slightly changing the final drink. You could also try Rose Sweetened Lime Juice for a sweeter drink. I also play around with different varieties of gin, form Tanquery, to Hendricks, to small batch Leopolds; again, each variety changes the end result, and all have been a success. That's what I love about homemade cocktails--the ability to tweak each drink to your own specific tastes.

With summer right around the corner, and finally some warm spring weather, this is a cocktail I'll be enjoying again and again.

Ginger Mayhem
Source: Inspired by the Ginger Mayhem at Ra Pour

Ingredients

3 shots ginger syrup or ginger beer
2 shots gin
1/2 shot lemon or lime juice
cubed ice

Directions
Combine all ingredients in a cocktail shaker filled with ice. Shake and pour into a low ball glass with cubed ice.

Tuesday, April 17, 2012

Homemade Ginger Syrup

ginger syrup

The husband and I are big Mad Men fans and, as a result, we've become increasingly interested in cocktails. I'm not talking Cosmos or Appletinis though; we like old fashioned drinks, preferably made with gin, like Singapore Slings and Sidecars. One of my favorite cocktails at a new restaurant/lounge nearby is their Ginger Mayhem; it's a gin-based drink with a strong ginger kick, made with their own ginger simple syrup.

I've been experimenting with creating the Ginger Mayhem at home, and my first tries used store-bought Ginger Beer, which turned out good results, but not a strong enough ginger flavor. I figured it couldn't be too hard to make my own ginger syrup, and after a quick Google search confirmed this, I was in the kitchen, boiling chopped ginger, water, and sugar.

Ginger syrup is incredibly easy to make, results in a nice golden-amber, spicy syrup, that can be used in cocktails or in homemade ginger ale (just pour it over ice with club soda). I poured mine in the Ginger Beer bottle I saved once the store-bought soda was gone.

Homemade Ginger Syrup
Source: Imbibe Magazine

Ingredients

2 cups unpeeled ginger, roughly chopped
2 cups sugar
6 cups water

Directions
Place all of the ginger in a food processor and process until ground.

Transfer the ginger to a large stockpot and add the sugar and water. Bring to a boil.

Turn the heat down to medium and let simmer, uncovered, for an hour to an hour and a half. The liquid will reduce to half.

Pour through a fine mesh strainer or cheesecloth into a large pitcher. You may need to strain it twice. Once the syrup has been strained, pour through a funnel into a bottle or lidded jar. Store in the refrigerator.

Sunday, April 15, 2012

Sushi Bowls

sushi bowl

The husband and I love sushi, and we often go out for rolls on Friday night. I've even tried making sushi at home before, and while it taster good, the effort required to put it together wasn't worth it for me. But then I found these sushi bowls on The Crumbly Cookie; I liked the idea of all the sushi ingredients and flavors combined simply in a bowl, but without the hassle of making rolls. Because really, what I wind up making is a mess.

The husband loved these sushi bowls he asked me to make them at least once a week. He was impressed how easy it was to put them together and the lack of a mess in the kitchen (I cook, he cleans!). :)

Make sure to get good-quality, sushi-grade fish since you'll be eating it raw. We like to go to 99 Ranch Market and pick out what looks the best. I used tuna steak this time, but we're thinking of trying salmon belly next time.

Sushi Bowls
Source: The Crumbly Cookie

tuna sushi bowl

Ingredients

1 1/2 cups uncooked rice, rinsed well
3 cups water
4 teaspoons rice vinegar
4 teaspoons sugar
1/2 teaspoon salt
1/4 cup soy sauce
1-2 teaspoons wasabi
1/4 pound raw fish
green onions, chopped
nori, torn into small pieces
2 Tablespoons sesame seeds (optional: toast them)


Directions

Combine rice and water in a rice cooker and cook. Or cook in a covered pot on the stovetop. Once rice is cooked, remove from heat and let sit, covered, for 10 minutes.

Combine the rice vinegar, sugar, and salt in a small microwaveable bowl and heat for 30 seconds. Stir to dissolve the sugar.

Transfer the rice to a large wooden or glass bowl (I used a large melamine bowl and it worked fine) and pour the vinegar mixture over the top. Fold and cut through the rice with a paddle or spatula to coat each grain with the vinegar mixture. Continue folding, cutting and fanning until the rice is room temperature-do not put in the refrigerator.

Combine the soy sauce and wasabi and pour over the cooled rice. Add in the fish, green onions, nori, and sesame seeds. Gently fold together to combine with the rice.

Serve with additional soy sauce and wasabi on the side.

Monday, February 20, 2012

Beef Kebabs


I've posted this recipe before, but we really love these beef kebabs, so when I made them again recently, I took the time to take a photo that actually does them justice. These kebabs are not the shish-kabobs I grew up with, but instead, they're the Middle Eastern-style kebabs the husband enjoyed as a kid.

The husband's cooking skills leave something to be desired, but this is one meal he'll jump in and help me prepare without a second thought. The cilantro and chipotle chilies bring a nice flavor and slight heat to the meat, which pairs well with the smokey flavor from the charcoal.

I usually serve these kebabs with tzatziki or plain yogurt mixed with chopped onions (sounds kind of gross, but it works. Also, the husband insists it is authentic and it's not kebabs without it).

Beef Kebabs
Source: Martha Stewart's Everyday Food (June 2011)

Ingredients

1 pound ground beef
1/2 small yellow onion, finely chopped
2 garlic cloves, finely chopped or grated
2 Tablespoons minced chipotle chiles in adobo sauce
1/2 cup cilantro, roughly chopped
1 teaspoon coarse salt
1/2 teaspoon pepper

Directions
Prepare a charcoal grill for direct heat. Clean and lightly oil the grates.

Combine all ingredients in a large bowl and mix together with your hands until well combined.

Divide the mixture into 6 equal portions. Shape each portion into an oval patty (about 4 inches long, 1 inch thick) with your hands. Insert skewers lengthwise.

Grill, turning occasionally, about 6-8 minutes, or until meat is cooked through.

Monday, January 2, 2012

A New Year

This blog has been sorely neglected for the past several months, despite my best intentions to blog more and increase the quality of my blogging in 2011. But, I am rarely home to cook anymore because I joined the coaching staff of a year-round competitive swim team in mid-September. Or should I say, re-joined. I was a swimmer on this team 7th grade through my first year of college, and then coached during my sophomore and super sophomore years, before spending several months in London, and then returning to the states to finish out my degree in San Francisco. It's been years since I hung up my goggles and stashed my stop watch, but funnily enough, right when I was feeling the itch to re-join the swimming world, I was asked if I wanted a position coaching the pre-senior level group.

Despite the fact that my group doesn't practice until three and a half hours after my teaching day ends, and I don't get home before 8pm anymore, I love coaching and being a part of these athletes' experience. However, because of these late evenings, I am rarely in the kitchen these days. I try to cook on the weekends, on days when the school I teach at is on break, or the rare evening we don't have swim practice, but I still come up short on blog-worthy recipes. So if you've been following me these past few months, wondering what my deal is, there you go. My plan for 2012 is to blog at least one new recipe a month--I think that's do-able and hopefully you'll still want to check in with me and see what I've been "cooking in Cucamonga". :)


My other blog, Janet From Another Planet, houses my non-cooking musings, vacation photos, and other aspects of my life outside the kitchen. It's a little more witty and a place to let my hair down and have some fun. Yep, I am that nerdy and just said that! :) Check out my recent list of 11 New Year's goals and maybe let me know some of your goals!

LinkWithin

Blog Widget by LinkWithin